
Installing an outdoor TV for watching sports doesn’t have to be complicated. This guide walks you through choosing the right TV, mounting it safely, protecting it from the elements, and setting up audio and streaming for the ultimate backyard game-day experience.
Key Takeaways
- Choose an outdoor-rated TV: Regular indoor TVs aren’t built to handle temperature swings, humidity, or direct sunlight. Look for models labeled “outdoor” or “weatherproof” for durability and performance.
- Pick the right location: Install your TV under a covered area like a patio, pergola, or awning to protect it from rain and direct sun. Ensure it’s at a comfortable viewing height and angle.
- Use a proper outdoor mount: Standard indoor mounts won’t cut it. Invest in a heavy-duty, weather-resistant mount designed for outdoor use with tilt and swivel options for flexible viewing.
- Protect all connections: Use weatherproof cable conduits, outdoor-rated extension cords, and surge protectors to keep power and signal cables safe from moisture and pests.
- Enhance audio and streaming: Add weatherproof speakers or a soundbar and connect to Wi-Fi or Ethernet for smooth streaming of live sports. Consider a streaming device like Roku or Apple TV.
- Maintain regularly: Clean the screen and vents monthly and inspect seals and cables seasonally to extend your TV’s lifespan and performance.
- Plan for power and internet: Ensure access to a grounded outdoor outlet and strong Wi-Fi signal. Use Wi-Fi extenders or Ethernet cables if needed for reliable connectivity.
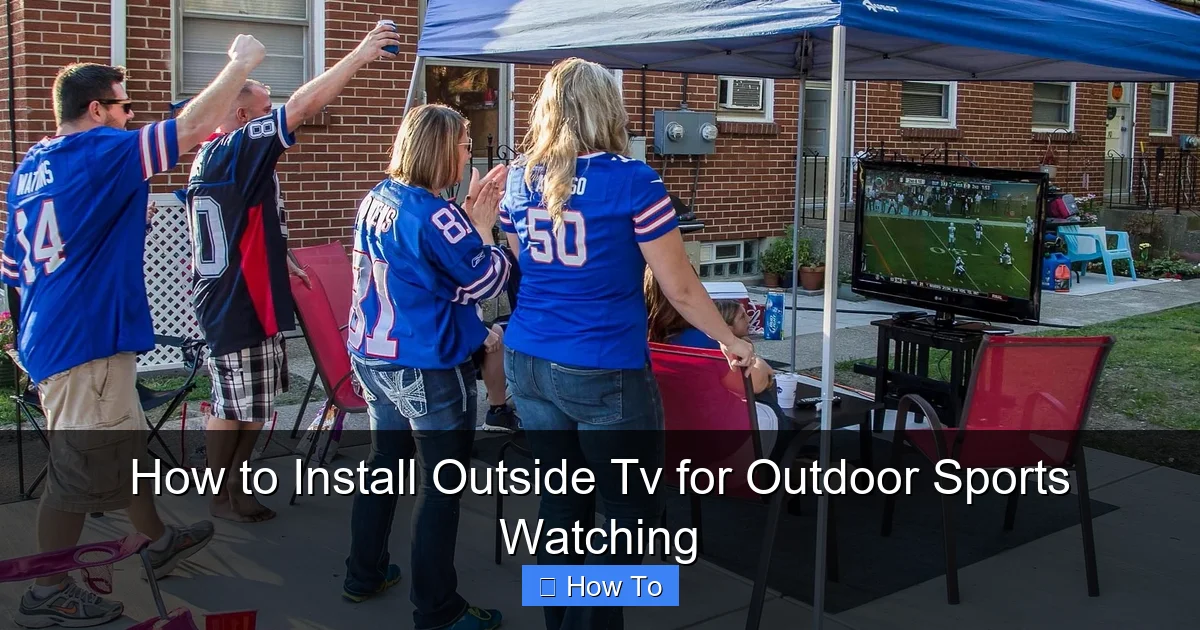
How to Install Outside TV for Outdoor Sports Watching
Watching the big game on a big screen under the open sky is every sports fan’s dream. Whether it’s the Super Bowl, March Madness, or the World Cup, having an outdoor TV lets you bring the stadium energy right into your backyard. But setting up a TV outside isn’t as simple as dragging your living room set onto the patio. You need the right equipment, smart planning, and a few weatherproofing tricks to make it work.
In this guide, we’ll walk you through every step of installing an outdoor TV for watching sports—from choosing the perfect model to mounting it safely, protecting it from the elements, and setting up audio and streaming for a seamless experience. By the end, you’ll have a durable, high-performing outdoor entertainment setup that’s ready for every touchdown, home run, and buzzer-beater.
Let’s get started!
Step 1: Choose the Right Outdoor TV
Visual guide about How to Install Outside Tv for Outdoor Sports Watching
Image source: 1.bp.blogspot.com
Not all TVs are built for the great outdoors. Indoor TVs may look great in your living room, but they’re not designed to handle temperature changes, humidity, rain, or direct sunlight. That’s why your first step is selecting a TV specifically made for outdoor use.
Look for Outdoor-Rated Models
Outdoor TVs are engineered with sealed casings, anti-glare screens, and internal cooling or heating systems to handle extreme temperatures. Brands like SunBrite, Samsung Terrace, and LG Outdoor offer models rated for full sun, partial shade, or covered areas.
– Full Sun Models: Best for open patios with direct sunlight. They have high brightness (2,000+ nits) and anti-reflective coatings.
– Partial Shade Models: Ideal for covered patios or under pergolas. They’re more affordable and still offer excellent brightness (1,000–1,500 nits).
– Covered Area Models: For fully shaded or enclosed spaces like screened porches. These are the most budget-friendly but still weather-resistant.
Consider Screen Size and Resolution
For outdoor viewing, bigger is usually better—especially if your seating area is 10–15 feet away. A 55-inch to 75-inch screen works well for most backyards. Go for at least 4K resolution for crisp, detailed images, especially during fast-paced sports.
Check Smart Features and Connectivity
Make sure your TV has built-in Wi-Fi, multiple HDMI ports, and support for streaming apps like YouTube TV, Hulu + Live TV, or ESPN+. This lets you watch live sports without extra devices—though we’ll cover streaming options later.
Budget Tips
Outdoor TVs cost more than indoor ones—typically $1,500 to $5,000+. If budget is tight, consider a high-brightness indoor TV with a weatherproof enclosure (more on that later). But for long-term durability, investing in a true outdoor model pays off.
Step 2: Pick the Perfect Location
Where you install your TV makes a huge difference in visibility, safety, and longevity. The ideal spot balances protection from the elements with a great viewing angle.
Choose a Covered Area
Avoid placing your TV in direct rain or snow. Install it under a covered patio, pergola, awning, or roof overhang. This protects the screen and internal components from water damage.
Mind the Sun and Glare
Even with an anti-glare screen, direct sunlight can wash out the picture. Position the TV so the screen faces north or south (depending on your hemisphere) to minimize glare. Avoid east or west-facing walls where the morning or afternoon sun hits directly.
Consider Viewing Height and Angle
Mount the TV at eye level when seated—typically 42 to 60 inches from the ground to the center of the screen. Use a tilt or full-motion mount to adjust the angle for different seating arrangements.
Check for Obstructions
Make sure trees, railings, or furniture won’t block the view. Also, avoid placing the TV near grills, fire pits, or sprinklers, which can expose it to smoke, grease, or water.
Step 3: Select and Install an Outdoor TV Mount
A sturdy, weatherproof mount is essential for safety and performance. Don’t use indoor mounts—they’re not built to handle outdoor conditions.
Choose the Right Mount Type
– Fixed Mount: Keeps the TV flush against the wall. Best for permanent setups with a clear, unchanging view.
– Tilt Mount: Allows you to angle the screen up or down. Great for adjusting to sun glare or different seating heights.
– Full-Motion (Articulating) Mount: Lets you swivel and extend the TV. Ideal for flexible viewing from multiple areas (e.g., patio and pool).
Ensure Weather Resistance
Look for mounts labeled “outdoor-rated” or “weatherproof.” They should have rust-resistant coatings (like powder-coated steel) and sealed hardware. Brands like Peerless, Sanus, and Vogel’s offer reliable outdoor options.
Install the Mount Securely
Use a stud finder to locate wall studs or use heavy-duty concrete anchors for brick or stucco walls. Follow the manufacturer’s instructions carefully. If you’re unsure, hire a professional installer—especially for heavy TVs or high walls.
Tip: Pre-Drill and Level
Mark your drill points, pre-drill holes, and use a level to ensure the mount is straight. A crooked TV is not only annoying but can also strain the mount over time.
Step 4: Run and Protect Cables
Exposed wires are a safety hazard and can get damaged by weather, pests, or foot traffic. Proper cable management keeps everything tidy and protected.
Use Outdoor-Rated Cables
Standard indoor cables aren’t UV-resistant or waterproof. Use outdoor-rated HDMI, power, and Ethernet cables with UV-protected jackets.
Install Conduit or Cable Channels
Run cables through PVC conduit, flexible raceways, or outdoor cable channels. These protect wires from moisture, rodents, and physical damage. Paint the conduit to match your wall for a cleaner look.
Connect to a GFCI Outlet
Plug your TV and devices into a Ground Fault Circuit Interrupter (GFCI) outlet. These shut off power automatically if they detect a leak, reducing the risk of electric shock.
Use a Surge Protector
Outdoor electronics are vulnerable to power surges from lightning or grid fluctuations. Use a heavy-duty outdoor surge protector with multiple outlets for your TV, streaming device, and speakers.
Label and Organize
Label each cable at both ends (e.g., “HDMI 1 – Apple TV”) and bundle them neatly with zip ties. This makes troubleshooting and future upgrades much easier.
Step 5: Set Up Power and Internet
A reliable power source and strong internet connection are crucial for uninterrupted sports streaming.
Ensure Access to Power
Your TV needs a nearby outdoor outlet. If you don’t have one, hire an electrician to install a GFCI outlet within 6–10 feet of the TV. Avoid long extension cords—they can overheat and reduce power delivery.
Boost Your Wi-Fi Signal
Outdoor areas often have weak Wi-Fi. To fix this:
– Use a Wi-Fi extender or mesh system placed near the patio.
– Run an Ethernet cable from your router to the TV for the fastest, most stable connection.
– Consider a powerline adapter if running Ethernet isn’t feasible.
Test the Connection
Before finalizing the setup, test your internet speed using a speed test app. For smooth 4K streaming, you’ll need at least 25 Mbps. If speeds are low, reposition your extender or upgrade your internet plan.
Step 6: Enhance Audio for the Ultimate Experience
Great picture is only half the battle—outdoor audio brings the crowd noise, commentary, and music to life.
Add Weatherproof Speakers
Install outdoor speakers around your seating area. Look for models with IPX5 or higher ratings for water resistance. Brands like Polk, Bose, and JBL offer great options.
Use a Soundbar or Outdoor Audio System
For a simpler setup, mount a weatherproof soundbar below or above the TV. Some outdoor TVs come with built-in speakers, but adding external audio dramatically improves sound quality.
Wireless Options
Bluetooth speakers are convenient but may have latency issues with live sports. For syncing audio and video, use wired speakers or a Wi-Fi-based system like Sonos.
Volume Control
Install a volume control knob or use a remote app to adjust sound without going inside. This is especially useful during loud games or quiet moments.
Step 7: Connect Streaming Devices and Apps
Most live sports are streamed online, so you’ll need a way to access your favorite platforms.
Use a Streaming Device
Even if your TV is “smart,” a dedicated streaming device offers better performance and more app options. Popular choices include:
– Roku Ultra: Great interface, supports 4K HDR, and works with most sports apps.
– Apple TV 4K: Seamless with Apple ecosystem, excellent for ESPN+, YouTube TV, and MLB.TV.
– Fire TV Stick 4K: Affordable, integrates with Amazon Prime Video and live TV services.
Install Sports Apps
Download apps like:
– ESPN+
– YouTube TV
– Hulu + Live TV
– fuboTV
– NFL, NBA, MLB, or NHL official apps
Set Up User Profiles
Create profiles for different family members so everyone can access their favorite teams and watch history.
Use a Universal Remote
Simplify control with a universal remote like Logitech Harmony. It can manage your TV, sound system, and streaming device with one remote.
Step 8: Weatherproof and Maintain Your Setup
Even the best outdoor TV needs regular care to last.
Clean the Screen and Vents
Wipe the screen monthly with a microfiber cloth and mild cleaner. Avoid ammonia-based products. Clean vents to prevent dust buildup, which can cause overheating.
Inspect Seals and Cables
Check rubber gaskets, conduit seals, and cable connections every few months. Replace any cracked or worn parts immediately.
Use a Weatherproof Cover (Optional)
When not in use, especially in winter, cover the TV with a breathable, waterproof cover. This adds an extra layer of protection against dust, pollen, and light rain.
Monitor for Pests
Rodents and insects love warm electronics. Keep the area clean and consider using pest deterrents near cables and vents.
Troubleshooting Common Issues
Even with careful planning, problems can arise. Here’s how to fix the most common ones.
TV Won’t Turn On
– Check the power outlet with another device.
– Ensure the surge protector is on and functioning.
– Verify all cables are securely connected.
Poor Picture Quality or Glare
– Adjust the TV angle to reduce sun reflection.
– Clean the screen—smudges and dirt worsen glare.
– Ensure you’re using a high-brightness outdoor TV in sunny areas.
Weak Wi-Fi or Buffering
– Move your Wi-Fi extender closer to the TV.
– Switch to a 5GHz band for less interference.
– Use Ethernet for a wired connection.
Audio Out of Sync
– Update your streaming device and TV firmware.
– Use wired audio connections instead of Bluetooth.
– Adjust audio delay settings in the TV or app menu.
Mount Feels Loose
– Tighten all bolts and screws.
– Check wall anchors—replace if stripped.
– Consult a professional if the mount is unstable.
Conclusion
Installing an outdoor TV for watching sports is a fantastic way to elevate your game-day experience. With the right TV, a secure mount, weatherproof cables, and strong audio and internet, you can enjoy every match under the stars—rain or shine.
Remember, the key to success is planning. Choose a covered location, invest in outdoor-rated equipment, and protect all connections from the elements. Regular maintenance will keep your setup running smoothly for years.
Whether you’re hosting a Super Bowl party or catching a quiet Sunday game, your outdoor TV will become the heart of your backyard entertainment. So grab some snacks, invite your friends, and get ready to cheer louder than ever—right from your own patio.

