
Installing a deck TV for outdoor kitchen enhances your outdoor living space, letting you enjoy movies, sports, and music while cooking. This guide walks you through planning, mounting, wiring, and protecting your TV from the elements—ensuring a safe, durable, and enjoyable setup.
Key Takeaways
- Choose an outdoor-rated TV: Regular indoor TVs aren’t built for weather, humidity, or temperature swings. Invest in a TV specifically designed for outdoor use.
- Plan your layout carefully: Consider viewing angles, distance from seating, sun exposure, and proximity to grills or sinks to avoid glare and damage.
- Use proper mounting hardware: A weatherproof, tiltable, or full-motion outdoor mount ensures secure installation and optimal viewing.
- Protect all electrical connections: Use outdoor-rated cables, conduit, and GFCI outlets to prevent water damage and electrical hazards.
- Run cables safely and discreetly: Conceal wiring through deck railings, under decking, or inside protective tubing to maintain aesthetics and safety.
- Test and maintain regularly: Check seals, connections, and screen clarity seasonally to extend your TV’s lifespan.
- Follow local codes and permits: Some areas require electrical permits or inspections—check with your local building authority before starting.
How to Install Deck TV for Outdoor Kitchen
Imagine this: It’s a warm summer evening. You’re grilling burgers, sipping lemonade, and your favorite game is playing on the big screen—right there in your outdoor kitchen. No more running inside to check the score or missing the finale of your show. With a deck TV for outdoor kitchen, you can enjoy entertainment and cooking in one seamless space.
But installing a TV outdoors isn’t as simple as mounting it on the wall and plugging it in. Outdoor environments bring challenges like rain, heat, dust, and UV exposure. That’s why a proper installation requires planning, the right tools, and weatherproofing know-how.
In this guide, you’ll learn how to install a deck TV for your outdoor kitchen safely and effectively. We’ll cover everything from choosing the right TV and mounting location to running power and hiding cables. Whether you’re a DIY enthusiast or hiring a pro, this step-by-step guide will help you create a stylish, functional, and long-lasting outdoor entertainment zone.
Let’s get started!
Step 1: Choose the Right Outdoor TV
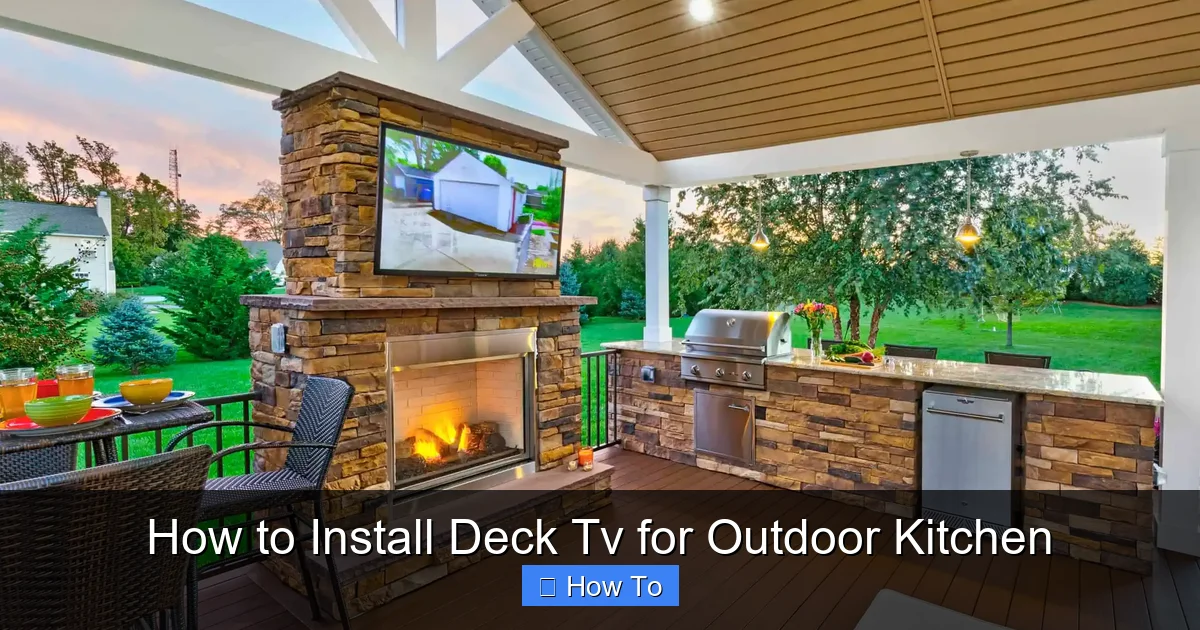
Visual guide about How to Install Deck Tv for Outdoor Kitchen
Image source: i2.wp.com
Not all TVs are created equal—especially when it comes to outdoor use. A regular indoor TV might work for a covered patio, but for a full outdoor kitchen on a deck, you need something built to withstand the elements.
Look for Outdoor-Rated Models
Outdoor TVs are specifically engineered for exterior environments. They feature:
– Weatherproof casings (IP54 or higher rating)
– Anti-glare screens
– Temperature-resistant components
– Built-in cooling and heating systems
Popular brands include Samsung Terrace, SunBriteTV, and Seura. These models are designed to operate in temperatures from -30°F to 120°F and resist moisture, dust, and direct sunlight.
Consider Screen Size and Resolution
For an outdoor kitchen, a 43-inch to 65-inch screen is ideal, depending on viewing distance. Sit 6–10 feet away for a 50-inch TV. Choose at least 4K resolution for sharp, clear images, especially in bright conditions.
Decide Between Partial and Full Outdoor Use
– Partial shade (covered deck): A weatherproof TV with a protective cover may suffice.
– Full exposure (open deck): Invest in a fully outdoor-rated model with sun-resistant coating and active cooling.
Tip: If your deck has a pergola or roof, you can use a less expensive partial-shade model. But if the TV will be in direct sun or rain, don’t cut corners—go full outdoor.
Step 2: Plan the TV Location and Viewing Angle
Where you place your TV affects both enjoyment and safety. A poor location can lead to glare, neck strain, or damage from heat and moisture.
Assess Your Deck Layout
Walk around your outdoor kitchen and note:
– Where people usually sit or stand
– The position of the grill, sink, and countertops
– Sun path throughout the day
– Wind and rain exposure
Avoid placing the TV directly above or next to the grill. Smoke, grease, and heat can damage the screen and internal components.
Determine Optimal Viewing Height
Mount the TV so the center of the screen is at or slightly below eye level when seated. For most people, this is about 42–48 inches from the ground. If your seating is elevated (like bar stools), adjust accordingly.
Minimize Glare and Reflections
Position the TV to avoid direct sunlight hitting the screen. Use a tiltable mount to angle the screen away from the sun’s path. If glare is unavoidable, consider a TV with an anti-reflective coating or install a retractable awning.
Ensure Safe Clearance
Leave at least 6–12 inches of space around the TV for ventilation. Don’t mount it too close to railings, planters, or overhead structures. Also, keep it away from sprinklers or areas prone to splashing.
Step 3: Select the Right Mounting System
A sturdy, weatherproof mount is essential for safety and performance. Don’t use indoor mounts—they’re not built for outdoor conditions.
Choose an Outdoor-Specific Mount
Look for mounts labeled “outdoor-rated” or “weatherproof.” These are made from corrosion-resistant materials like powder-coated steel or aluminum.
Types of mounts:
– Fixed mounts: Hold the TV flat against the wall. Best for permanent, glare-free locations.
– Tilt mounts: Allow you to angle the screen up or down. Great for adjusting to sun position.
– Full-motion (articulating) mounts: Let you swivel and extend the TV. Ideal if you want to view from multiple areas.
For a deck TV near an outdoor kitchen, a tilt or full-motion mount offers the most flexibility.
Check Weight and Size Compatibility
Make sure the mount supports your TV’s size and weight. Most outdoor mounts handle 32–75 inch TVs and up to 100–150 lbs. Always double-check the manufacturer’s specs.
Consider a Ceiling or Post Mount (Optional)
If you don’t have a wall, you can install a ceiling mount under a pergola or use a freestanding post mount. These options require additional structural support but offer more placement freedom.
Step 4: Prepare the Mounting Surface
Before drilling any holes, ensure the surface can support the TV and mount securely.
Identify Wall Structure
Most deck walls are made of wood, brick, or concrete. Use a stud finder to locate wall studs if mounting on wood. For brick or concrete, you’ll need masonry anchors.
Reinforce if Necessary
If the wall is thin or made of composite material, consider adding a backing board. Attach a piece of pressure-treated plywood (at least 3/4 inch thick) between two studs. This provides a solid anchor point for lag bolts.
Mark the Mounting Points
Hold the mount against the wall and use a level to ensure it’s straight. Mark the screw holes with a pencil. Double-check measurements before drilling.
Tip: Use a laser level for precision, especially on large mounts.
Step 5: Run Power and Signal Cables Safely
Powering your outdoor TV requires careful planning to avoid electrical hazards and water damage.
Use a GFCI Outlet
Outdoor electrical outlets must be GFCI (Ground Fault Circuit Interrupter) protected. This shuts off power if it detects a ground fault, preventing shocks.
If your deck doesn’t have a GFCI outlet, hire a licensed electrician to install one. Never use indoor outlets or extension cords outdoors.
Plan the Cable Route
Decide how to run power and HDMI cables from the outlet to the TV. Options include:
– Through the wall (if accessible from inside)
– Under the deck
– Along the railing
– Through protective conduit
Avoid running cables where they can be tripped over or exposed to water.
Use Outdoor-Rated Cables
Standard indoor cables degrade quickly outdoors. Use:
– Outdoor-rated power cords (SJTW or SJTOW)
– Direct burial HDMI cables (if running underground)
– UV-resistant cable covers or conduit
For HDMI, consider a wireless transmitter (like a Wi-Fi HDMI extender) to reduce cable clutter.
Protect Connections with Junction Boxes
If you must splice wires, use a weatherproof junction box. Seal all connections with electrical tape and silicone caulk.
Never leave loose wires exposed. Water and electricity are a dangerous mix.
Step 6: Install the Mount and TV
Now it’s time to put everything together. Take your time—rushing can lead to mistakes.
Attach the Mount to the Wall
– Drill pilot holes for lag bolts.
– Secure the mount using stainless steel or galvanized screws.
– Use a level to confirm it’s straight.
– Tighten all bolts firmly, but don’t over-tighten and strip the wood.
Connect Cables to the TV
Before mounting the TV, connect the power cord, HDMI, and any other cables (like USB or antenna). Leave enough slack to route them through the mount.
Mount the TV
With a helper, lift the TV and hook it onto the mount. Follow the manufacturer’s instructions for your specific model. Most outdoor mounts use a locking mechanism to prevent theft or accidental dislodging.
Secure and Conceal Cables
Use cable clips, raceways, or flexible conduit to hide and protect wires. Route them along the wall or under the deck. For a clean look, paint conduit to match your deck color.
Step 7: Weatherproof and Protect the Setup
Even with an outdoor TV, extra protection extends its life and performance.
Apply Silicone Sealant
Seal around the mount and any wall penetrations with outdoor-grade silicone caulk. This prevents water from seeping into the wall.
Use a Weatherproof Cover (Optional)
When not in use, cover the TV with a fitted, breathable outdoor TV cover. This protects against dust, pollen, and light rain.
Avoid plastic covers—they trap moisture and cause condensation.
Install a Surge Protector
Outdoor electronics are vulnerable to power surges from lightning or grid fluctuations. Plug your TV and devices into a high-quality outdoor surge protector.
Consider a Ventilation Fan (for Enclosed Areas)
If the TV is in a cabinet or under a tight overhang, install a small, weatherproof fan to prevent overheating.
Step 8: Test and Calibrate the TV
Once everything is installed, it’s time to test your setup.
Power On and Check Connections
Turn on the TV and verify that all inputs (HDMI, antenna, streaming devices) work. Adjust picture settings for outdoor viewing—increase brightness and contrast to combat glare.
Test Audio
If using built-in speakers, ensure sound is clear. For better audio, connect outdoor speakers or a soundbar. Place speakers near seating areas, away from wind and water.
Check Remote Control Range
Test the remote from different angles and distances. If the signal is weak, consider an IR extender or Bluetooth remote.
Troubleshooting Common Issues
Even with careful planning, problems can arise. Here’s how to fix the most common ones.
TV Won’t Turn On
– Check the GFCI outlet—press the “Reset” button.
– Verify the power cord is securely plugged in.
– Test the outlet with another device.
Screen Glare or Washed-Out Picture
– Adjust the TV angle using the tilt feature.
– Clean the screen with a microfiber cloth.
– Enable “Outdoor Mode” if your TV has one.
Overheating or Shutting Down
– Ensure proper ventilation around the TV.
– Remove any covers or obstructions.
– Check if the TV’s internal fan is working.
Water Damage or Condensation
– Inspect seals and caulk for gaps.
– Use a dehumidifier in enclosed spaces.
– Replace damaged cables or connectors.
Weak Wi-Fi Signal
– Move your router closer or use a Wi-Fi extender.
– Switch to a 5GHz band for less interference.
– Use a wired Ethernet connection if possible.
Maintenance Tips for Long-Term Use
To keep your deck TV in top shape, follow these maintenance practices:
Clean the Screen Monthly
Use a soft, dry microfiber cloth. For smudges, lightly dampen the cloth with water or a screen-safe cleaner. Never spray liquid directly on the TV.
Inspect Seals and Cables Quarterly
Check for cracks, fraying, or loose connections. Replace damaged parts immediately.
Check Mounting Hardware Annually
Tighten bolts and screws. Look for rust or corrosion, especially in coastal areas.
Cover During Extreme Weather
During storms, heavy snow, or hurricanes, use a cover or bring the TV inside if possible.
Update Software Regularly
Keep your TV’s firmware and apps updated for security and performance.
Conclusion
Installing a deck TV for outdoor kitchen transforms your backyard into a true entertainment hub. With the right TV, mount, and weatherproofing, you can enjoy your favorite shows, movies, and games while grilling, dining, or relaxing outdoors.
Remember: safety and durability come first. Use outdoor-rated equipment, protect all electrical connections, and plan your layout carefully. Take your time with each step, and don’t hesitate to consult a professional for electrical work.
Once your TV is up and running, you’ll wonder how you ever lived without it. Whether it’s game day, movie night, or a quiet evening under the stars, your outdoor kitchen will be the heart of your home.
So grab your tools, follow this guide, and get ready to enjoy the ultimate outdoor experience—one screen at a time.

