
Transform your deck into an outdoor entertainment hub by installing a backyard TV. This guide walks you through choosing the right TV, mounting it safely, running power and cables, and protecting it from the elements—so you can enjoy your favorite shows rain or shine.
Key Takeaways
- Choose an outdoor-rated TV: Regular indoor TVs aren’t built to withstand weather, temperature swings, or glare. Opt for a weatherproof, outdoor-specific model designed for decks and patios.
- Pick the right mounting location: Install your TV under a covered area or use a weatherproof enclosure to protect it from rain, snow, and direct sunlight.
- Ensure proper power and signal setup: Run weatherproof electrical wiring and use outdoor-rated HDMI or coaxial cables to connect your TV to sources like streaming devices or cable boxes.
- Use a sturdy, adjustable mount: A full-motion or tilting outdoor mount gives you flexibility to angle the screen for the best viewing from different seating areas.
- Protect against theft and damage: Secure your TV with anti-theft locks and consider a protective cover when not in use to extend its lifespan.
- Test everything before finalizing: Power up, check picture and sound quality, and ensure all connections are secure and weather-sealed.
- Enhance the experience: Add outdoor speakers, string lights, or a fire pit to create a cozy, cinema-like atmosphere on your deck.
How to Install Backyard TV for Deck Entertainment
Imagine relaxing on your deck with friends and family, watching the big game, a movie night under the stars, or your favorite streaming series—all on a big screen right in your backyard. Installing a backyard TV for deck entertainment isn’t just a luxury; it’s a smart way to extend your living space and enjoy the great outdoors in comfort. Whether you’re hosting a summer BBQ or enjoying a quiet evening solo, a properly installed outdoor TV can elevate your outdoor experience.
But it’s not as simple as mounting a regular TV on the wall and calling it a day. Outdoor environments present unique challenges: weather, glare, power access, and signal interference. That’s why a thoughtful, step-by-step approach is essential. In this guide, we’ll walk you through everything you need to know to install a backyard TV safely, securely, and effectively—so you can enjoy seamless entertainment on your deck year-round.
You’ll learn how to choose the right TV, pick the best mounting spot, run power and cables, secure the installation, and even enhance your setup with audio and lighting. By the end, you’ll have a weather-resistant, high-quality outdoor viewing experience that’s both functional and stylish.
Step 1: Choose the Right Outdoor TV
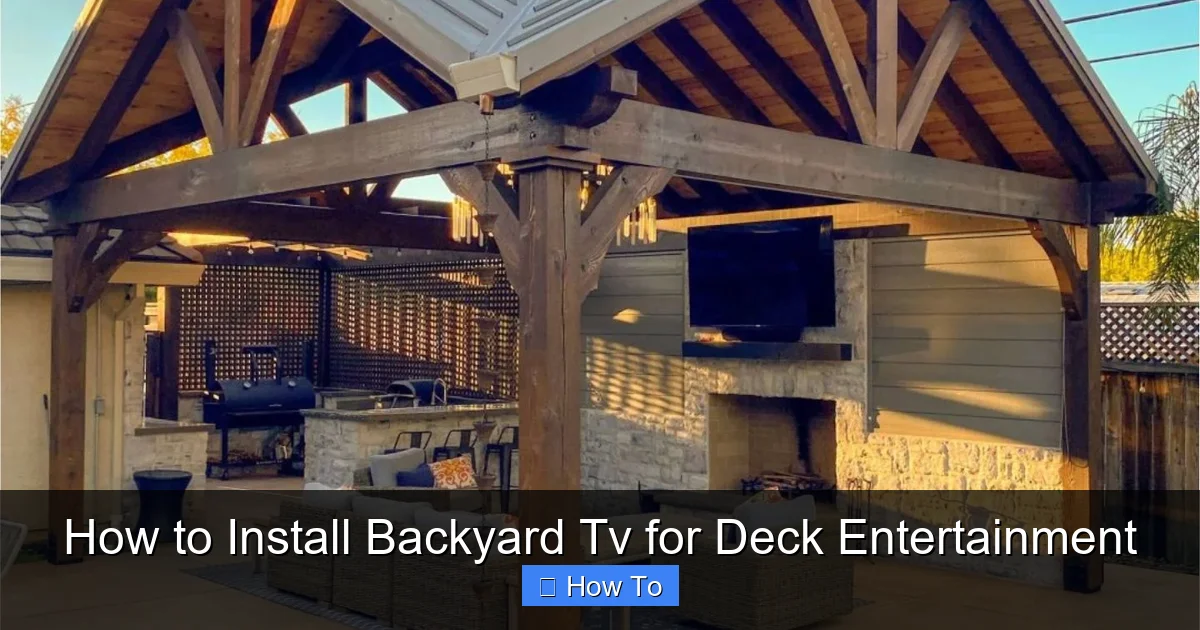
Visual guide about How to Install Backyard Tv for Deck Entertainment
Image source: thebackyardshowcase.com
The foundation of a successful backyard TV installation starts with selecting the right television. Not all TVs are created equal—especially when it comes to outdoor use. Indoor TVs are not designed to handle temperature fluctuations, humidity, rain, or direct sunlight. Using one outside can lead to overheating, screen damage, or even electrical hazards.
Look for an Outdoor-Rated TV
When shopping for a backyard TV, prioritize models specifically labeled as “outdoor” or “weatherproof.” These TVs are built with sealed casings, corrosion-resistant materials, and enhanced cooling systems to withstand the elements. Brands like Samsung, SunBrite, and Seura offer high-quality outdoor TVs designed for patios, decks, and pool areas.
Outdoor TVs typically come in two styles:
– Partial-Outdoor (Covered Areas): Ideal for decks with roofs, pergolas, or awnings. These models can handle light moisture and temperature changes but shouldn’t be exposed to direct rain.
– Full-Outdoor (All-Weather): Built for full exposure to rain, snow, and sun. These are more expensive but offer maximum durability.
Consider Screen Size and Resolution
Choose a screen size that fits your deck layout and viewing distance. For most decks, a 43-inch to 65-inch TV works well. If your seating is 8–12 feet away, a 55-inch screen offers an immersive experience without overwhelming the space.
Resolution matters too. Go for at least 4K Ultra HD for crisp, clear images, especially in bright outdoor conditions. Many outdoor TVs also feature anti-glare coatings to reduce reflections from sunlight.
Check Built-in Features
Look for smart TV capabilities so you can stream directly from apps like Netflix, Hulu, or YouTube without needing an external device. Built-in Wi-Fi and Bluetooth are also helpful for connecting wireless speakers or headphones.
Step 2: Select the Best Mounting Location
Where you mount your TV is just as important as the TV itself. The right location ensures optimal viewing, protects the TV from weather, and keeps cables hidden and secure.
Choose a Covered or Shaded Area
Even with an outdoor-rated TV, it’s best to install it under a covered section of your deck—like under a pergola, roof overhang, or awning. This protects the screen from direct rain and reduces glare from the sun. If your deck is fully exposed, consider installing a retractable awning or shade sail to create a sheltered viewing zone.
Ensure Structural Support
The wall or beam you mount the TV to must be strong enough to support the weight. Use a stud finder to locate solid wood or metal framing. Avoid mounting on vinyl siding, thin drywall, or weak structures. If you’re mounting to a post or beam, ensure it’s securely anchored to the deck frame.
Optimize Viewing Angle
Position the TV at eye level when seated—typically 42 to 48 inches from the floor to the center of the screen. Avoid placing it too high or too low, as this can cause neck strain. If your deck has multiple seating areas, choose a central location that offers good visibility from all angles.
Allow for Ventilation and Access
Outdoor TVs generate heat and need airflow to prevent overheating. Leave at least 2–3 inches of space around the TV for ventilation. Also, ensure you can easily access the back for cable connections and future maintenance.
Step 3: Choose the Right Mount
A sturdy, weatherproof mount is essential for a safe and flexible installation. Regular indoor mounts aren’t designed for outdoor conditions and may rust or fail over time.
Types of Outdoor TV Mounts
– Fixed Mount: Holds the TV flush against the wall. Best for permanent, straight-on viewing. Simple and secure, but offers no adjustability.
– Tilting Mount: Allows you to angle the TV up or down to reduce glare and improve viewing from different heights. Great for decks with varying seating levels.
– Full-Motion (Articulating) Mount: Lets you swivel, tilt, and extend the TV. Ideal if you want to watch from multiple areas—like the dining table, lounge chairs, or hot tub.
For most deck setups, a tilting or full-motion mount offers the best flexibility.
Ensure Weather Resistance
Choose a mount labeled as “outdoor-rated” or “weatherproof.” Look for powder-coated steel or aluminum construction to resist rust and corrosion. Avoid cheap plastic mounts—they won’t hold up in the elements.
Check Weight and Size Compatibility
Match the mount to your TV’s VESA pattern (the screw hole layout on the back) and weight. Most mounts list compatible TV sizes and weight limits. When in doubt, go with a mount rated for a larger TV than yours for extra safety.
Step 4: Run Power and Cables Safely
Powering your backyard TV and connecting it to sources like a streaming box, cable, or sound system requires careful planning. Exposed wires are not only unsightly—they’re a safety hazard.
Plan Your Power Source
Locate the nearest outdoor electrical outlet. If none exists, hire a licensed electrician to install one. Outdoor outlets must be GFCI-protected (Ground Fault Circuit Interrupter) to prevent shocks in wet conditions.
Never use indoor extension cords outside. Instead, use a heavy-duty, outdoor-rated extension cord with a weatherproof cover, or better yet, run permanent wiring through conduit.
Use Outdoor-Rated Cables
Standard HDMI and coaxial cables aren’t built for outdoor use. They can degrade from UV exposure, moisture, and temperature changes. Use outdoor-rated HDMI cables with UV-resistant jackets and waterproof connectors.
For longer runs (over 25 feet), consider fiber optic HDMI cables, which maintain signal quality over distance and are less prone to interference.
Conceal and Protect Cables
Run cables through weatherproof conduit or use cable raceways designed for outdoor use. Attach them to the wall or under the deck with outdoor-rated clips. Avoid loose, dangling wires that can trip people or get damaged.
If running cables through walls or under the deck, seal all entry points with silicone caulk to prevent water intrusion.
Connect Your Devices
Plug your streaming device (like a Roku, Apple TV, or Fire Stick), cable box, or gaming console into a weatherproof outdoor media enclosure near the TV. These enclosures protect electronics from rain and dust.
Use a surge protector inside the enclosure to safeguard against power surges. For wireless setups, ensure your Wi-Fi signal reaches the deck—consider a Wi-Fi extender if needed.
Step 5: Install the TV and Mount
Now it’s time to put everything together. Take your time, follow the instructions, and don’t rush this step.
Prepare the Mounting Surface
Clean the wall or beam where you’ll mount the TV. Remove any dirt, grease, or loose paint. Use a level to mark the mounting holes accurately. Drill pilot holes to prevent splitting the wood.
Attach the Mount
Secure the mount to the wall using stainless steel lag bolts or screws designed for outdoor use. Tighten them firmly, but don’t over-torque. Double-check that the mount is level and secure.
Connect Cables Before Mounting the TV
Thread HDMI, power, and other cables through the mount’s cable management system. Connect them to the TV before lifting it into place. This prevents strain on the ports and makes adjustments easier.
Mount the TV
With a helper, lift the TV and attach it to the mount according to the manufacturer’s instructions. Most mounts use locking mechanisms or security screws to prevent tampering. Tighten all bolts and ensure the TV is secure.
Test the Setup
Plug in the power and turn on the TV. Check the picture quality, sound, and all connected devices. Adjust the angle if needed. Make sure the screen is visible from all seating areas and free of glare.
Step 6: Secure and Protect Your TV
Outdoor TVs are tempting targets for theft and damage. Take steps to protect your investment.
Use Anti-Theft Locks
Many outdoor mounts include security screws or locking mechanisms. Use them. You can also add a cable lock (like a Kensington lock) for extra security.
Install a Protective Cover
When not in use, cover your TV with a weatherproof, breathable cover. This shields it from dust, pollen, and light rain. Avoid plastic covers that trap moisture—opt for fabric covers with UV protection.
Regular Maintenance
Clean the screen monthly with a microfiber cloth and mild cleaner. Check cables and connections for wear. Inspect the mount and bolts annually to ensure they’re tight and rust-free.
Step 7: Enhance Your Deck Entertainment Setup
Your backyard TV is installed—now make the experience even better.
Add Outdoor Speakers
Built-in TV speakers often lack volume and clarity outdoors. Install weatherproof speakers on posts, under the deck, or in planters. Wireless Bluetooth speakers are easy to set up and move around.
Install Ambient Lighting
String lights, LED strip lights, or solar-powered path lights create a cozy atmosphere. Avoid bright lights that cause glare on the screen. Use dimmable options for adjustable mood lighting.
Create a Viewing Zone
Arrange outdoor furniture—like sectionals, Adirondack chairs, or a daybed—around the TV. Add outdoor rugs, throw pillows, and a coffee table for snacks and drinks.
Consider a Fire Pit or Heater
Extend your viewing season with a fire pit or outdoor heater. They add warmth and ambiance, making your deck usable even on cooler nights.
Troubleshooting Common Issues
Even with careful planning, problems can arise. Here’s how to fix common issues:
TV Won’t Turn On
Check the power source. Ensure the outlet has power and the GFCI hasn’t tripped. Verify all cables are securely connected.
Poor Picture Quality
Adjust the TV’s brightness and contrast settings for outdoor viewing. Check for loose HDMI connections or signal interference from nearby electronics.
Wi-Fi Signal Weak
Move your router closer or install a Wi-Fi extender. Use a wired Ethernet connection if possible for faster, more reliable streaming.
Screen Glare
Reposition the TV to avoid direct sunlight. Use a tilting mount to angle the screen away from reflections. Install a shade or awning if needed.
Overheating
Ensure proper ventilation around the TV. Avoid enclosing it in a tight space. If overheating persists, check the manufacturer’s guidelines.
Conclusion
Installing a backyard TV for deck entertainment is a rewarding project that transforms your outdoor space into a true extension of your home. By choosing the right outdoor-rated TV, mounting it securely, running weatherproof cables, and protecting it from the elements, you can enjoy high-quality viewing under the stars—rain or shine.
Remember, safety and durability are key. Don’t cut corners on weatherproofing or electrical work. When in doubt, consult a professional. With the right setup, your deck becomes the ultimate spot for movie nights, game days, and relaxing evenings with loved ones.
So grab your favorite blanket, fire up the popcorn maker, and get ready to enjoy your backyard TV—your outdoor entertainment oasis is ready.

