
Installing an outdoor TV in your outdoor kitchen enhances your alfresco experience, letting you enjoy movies, sports, or music while cooking. This guide walks you through every step—from choosing the right TV to mounting, wiring, and protecting it from the elements—so you can enjoy a weatherproof, high-quality setup that lasts.
Key Takeaways
- Choose a true outdoor TV: Regular indoor TVs aren’t built for sun, rain, or temperature swings. Opt for a certified outdoor model designed for all-weather use.
- Pick the right location: Mount your TV under a covered area like a pergola or roof overhang to protect it from direct sun and rain.
- Use weatherproof mounts and cables: Standard indoor hardware won’t last outdoors. Invest in corrosion-resistant mounts and outdoor-rated cables.
- Plan your wiring carefully: Run power and signal cables through conduit or along protected pathways to prevent water damage and tripping hazards.
- Ensure proper ventilation: Even outdoor TVs need airflow. Avoid enclosing the TV in tight spaces that trap heat.
- Test everything before finalizing: Power up and check picture, sound, and connectivity before securing all components.
- Maintain regularly: Clean the screen and check seals seasonally to keep your outdoor TV in top shape.
How to Install Outdoor TV for Outdoor Kitchen
Imagine this: you’re grilling up burgers on a warm summer evening, the sun is setting, and your favorite game is playing on a crisp, clear screen right above your outdoor kitchen counter. No squinting, no glare, no worrying about rain ruining your TV. That’s the magic of a properly installed outdoor TV in your outdoor kitchen.
But setting it up isn’t as simple as mounting a regular TV on the wall. Outdoor environments bring heat, humidity, rain, dust, and temperature swings—all of which can damage standard electronics. That’s why installing an outdoor TV for your outdoor kitchen requires careful planning, the right equipment, and smart execution.
In this comprehensive guide, you’ll learn exactly how to install an outdoor TV for your outdoor kitchen—step by step. We’ll cover everything from choosing the right TV and location to mounting, wiring, weatherproofing, and maintenance. Whether you’re a DIY enthusiast or working with a contractor, this guide will help you create a safe, durable, and enjoyable outdoor entertainment space.
Let’s get started.
Step 1: Choose the Right Outdoor TV
Visual guide about How to Install Outdoor Tv for Outdoor Kitchen
Image source: i.pinimg.com
Not all TVs are created equal—especially when it comes to outdoor use. A regular indoor TV might work for a day or two in a covered patio, but it won’t survive long-term exposure to the elements. That’s why your first step is selecting a TV specifically designed for outdoor use.
What Makes an Outdoor TV Different?
Outdoor TVs are built with weather-resistant materials, sealed components, and enhanced brightness to combat glare from sunlight. They’re also designed to operate in a wider temperature range—typically from -30°F to 120°F—so they won’t shut down on a hot summer day or freeze up in winter.
Look for TVs labeled as “all-weather,” “outdoor-rated,” or “weatherproof.” Brands like SunBrite, Samsung Terrace, and Seura are known for high-quality outdoor models.
Consider Screen Size and Resolution
For an outdoor kitchen, a 43-inch to 65-inch screen is usually ideal. Anything smaller might be hard to see from a distance, while larger screens can overwhelm the space. Choose at least 4K resolution for sharp, vibrant images, especially if you’ll be watching sports or movies.
Decide Between Partial and Full Sun Models
– Partial Sun TVs: Best for covered areas like under a pergola or roof overhang. They’re more affordable and still offer excellent brightness (around 700–1,000 nits).
– Full Sun TVs: Built for direct sunlight with ultra-high brightness (1,500+ nits) and anti-glare coatings. These are pricier but necessary if your outdoor kitchen gets direct sun.
For most outdoor kitchens, a partial sun model is sufficient—especially if you have some shade.
Check Connectivity Options
Make sure your TV has the ports you need: HDMI, USB, Wi-Fi, and Bluetooth. If you plan to connect a soundbar, gaming console, or streaming device, confirm compatibility.
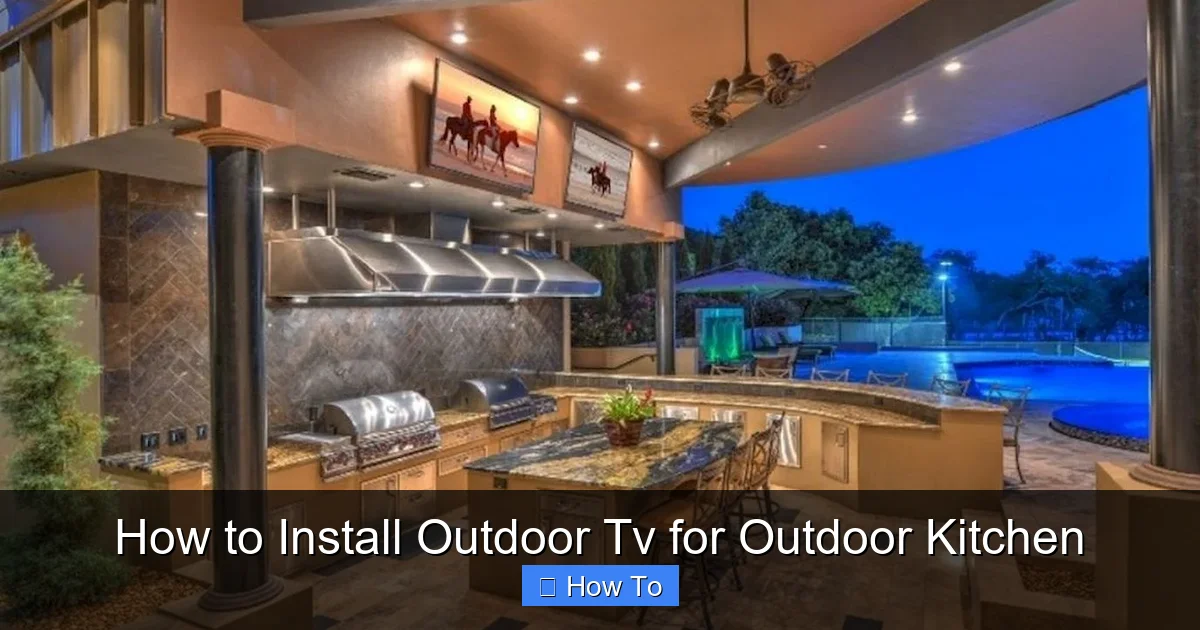
Step 2: Pick the Perfect Location
Where you mount your TV is just as important as the TV itself. The right spot ensures great viewing angles, protects the TV from weather, and keeps cables out of the way.
Look for Covered Areas
Your outdoor kitchen likely has a roof, pergola, or awning—these are perfect spots. Mounting the TV under cover shields it from rain, snow, and direct sunlight, which can cause overheating and screen damage.
Avoid placing the TV where it will be hit by sprinklers, pool splashes, or garden hoses.
Consider Viewing Angles
Think about where people will be sitting or standing. You want a spot that’s visible from the grill, dining area, and seating zone. Ideally, the center of the screen should be at eye level when seated—about 42 to 48 inches from the ground.
Avoid Heat and Moisture Traps
Don’t mount the TV directly above a grill or smoker. Heat and smoke can damage the screen and internal components. Also, avoid areas with poor ventilation or where water might pool.
Check for Obstructions
Make sure trees, cabinets, or lighting fixtures won’t block the view. Trim any overhanging branches if needed.
Step 3: Choose the Right Mount
A sturdy, weatherproof mount is essential for safety and longevity. Don’t use an indoor mount—it will rust and fail over time.
Types of Outdoor TV Mounts
– Fixed Mount: Keeps the TV flush against the wall. Great for permanent setups with a clear view.
– Tilt Mount: Allows you to angle the screen up or down. Useful if the TV is mounted high.
– Full-Motion (Articulating) Mount: Lets you swivel and extend the TV. Ideal if you want to adjust the angle based on seating.
For most outdoor kitchens, a tilt or fixed mount works best. Full-motion mounts are heavier and more complex to install.
Ensure Weather Resistance
Look for mounts labeled “outdoor-rated” or “weatherproof.” They should be made of powder-coated aluminum or stainless steel to resist rust and corrosion.
Check Weight and Size Compatibility
Match the mount to your TV’s VESA pattern (the screw hole layout on the back) and weight. Most outdoor mounts support TVs up to 100 lbs.
Step 4: Plan Your Wiring and Power
Running cables outdoors requires extra care. You’ll need power for the TV and possibly for streaming devices, sound systems, or lighting.
Power Source
Locate the nearest outdoor electrical outlet. If you don’t have one, hire a licensed electrician to install a GFCI (Ground Fault Circuit Interrupter) outlet near your outdoor kitchen. This is required by code for safety.
Never use indoor extension cords outdoors. They’re not rated for moisture and can become fire hazards.
Run Power and Signal Cables
Use outdoor-rated, UV-resistant cables for HDMI, power, and Ethernet. These are thicker and have protective jackets to withstand sun and rain.
Use Conduit for Protection
Run cables through PVC or metal conduit to protect them from rodents, weather, and accidental damage. Bury the conduit underground if running it across the yard, or secure it along the wall with clips.
Label and Organize Cables
Use cable ties and labels to keep everything neat. This makes future troubleshooting or upgrades easier.
Consider a Power Strip with Surge Protection
Plug all devices into a weatherproof outdoor surge protector. This safeguards your TV and accessories from power surges during storms.
Step 5: Install the Mount
Now it’s time to secure the mount to the wall. This step requires precision to ensure the TV is level and safe.
Gather Your Tools
You’ll need:
– Drill
– Level
– Tape measure
– Screwdriver or impact driver
– Masonry bits (if mounting on brick or concrete)
– Stud finder (for wood or drywall)
Locate Studs or Use Anchors
If mounting on wood or drywall, find the studs using a stud finder. Screw the mount directly into the studs for maximum strength.
For brick, concrete, or stucco, use heavy-duty masonry anchors or toggle bolts. Pre-drill holes carefully to avoid cracking.
Mark and Drill Holes
Hold the mount against the wall where you want it. Use a level to ensure it’s straight. Mark the screw holes with a pencil.
Drill pilot holes, then attach the mount with the provided screws. Double-check that it’s secure and level.
Tighten All Bolts
Once mounted, tighten all bolts and screws. Wiggle the mount to test stability—it shouldn’t move.
Step 6: Mount the TV
With the mount securely in place, it’s time to attach the TV.
Attach Mounting Brackets to the TV
Most outdoor TVs come with VESA-compatible brackets. Screw these into the back of the TV using the correct bolts (usually included).
Lift and Secure the TV
With a helper, lift the TV and hook it onto the wall mount. Make sure it locks into place. Some mounts have safety screws to prevent accidental removal.
Adjust the Angle
If using a tilt or articulating mount, adjust the screen to the best viewing angle. Tighten any adjustment knobs to lock it in place.
Check Stability
Gently push on the TV to ensure it’s secure. It shouldn’t wobble or shift.
Step 7: Connect and Test
Now that the TV is mounted, connect all your devices and test the system.
Connect Power and Cables
Plug the TV into the outdoor surge protector. Connect HDMI cables to your streaming device, gaming console, or sound system.
If using a soundbar, place it below or above the TV and connect via HDMI ARC or Bluetooth.
Turn On and Configure
Power on the TV and follow the on-screen setup. Connect to Wi-Fi, sign into streaming apps, and adjust picture settings.
Test All Functions
Check:
– Picture quality in daylight and at night
– Sound clarity
– Remote control range
– App performance (Netflix, YouTube, etc.)
Make sure everything works before finalizing the installation.
Step 8: Weatherproof and Secure
Even with an outdoor TV, extra protection helps it last longer.
Seal Cable Connections
Use silicone sealant or outdoor electrical tape to seal any exposed cable connections. This prevents moisture from entering.
Install a Weatherproof Cover (Optional)
Some homeowners add a retractable cover or awning over the TV for extra protection during storms or off-seasons.
Secure Loose Cables
Use cable clips or raceways to keep wires tidy and protected. Avoid letting cables dangle where they can be tripped over or chewed by animals.
Step 9: Maintain Your Outdoor TV
Regular maintenance keeps your TV performing well for years.
Clean the Screen Monthly
Use a microfiber cloth and mild screen cleaner. Avoid harsh chemicals or paper towels, which can scratch the surface.
Check Mounts and Cables Seasonally
Inspect for rust, loose screws, or frayed wires. Tighten or replace as needed.
Protect During Extreme Weather
If a hurricane or snowstorm is coming, consider covering the TV with a weatherproof blanket or temporarily removing it if possible.
Troubleshooting Common Issues
Even with careful installation, problems can arise. Here’s how to fix the most common ones.
TV Won’t Turn On
– Check the power outlet with another device.
– Ensure the surge protector is on and functional.
– Verify the TV’s power cord is securely plugged in.
Poor Picture Quality in Sunlight
– Make sure you’re using a partial or full sun TV.
– Adjust the screen brightness in settings.
– Consider adding a shade or awning.
Remote Not Working
– Replace the batteries.
– Ensure there’s no obstruction between the remote and TV.
– Try using the TV’s mobile app as an alternative.
Overheating
– Check that the TV has proper airflow.
– Avoid enclosing it in a cabinet.
– Ensure it’s not in direct sunlight for long periods.
Water Damage
– If the TV gets wet, unplug it immediately.
– Let it dry completely before use.
– Contact the manufacturer if internal damage is suspected.
Conclusion
Installing an outdoor TV for your outdoor kitchen is a rewarding project that transforms your space into a true entertainment hub. With the right TV, mount, wiring, and weatherproofing, you can enjoy crystal-clear viewing in any season.
Remember: safety and durability come first. Always use outdoor-rated equipment, hire professionals for electrical work, and maintain your setup regularly.
Whether you’re watching the big game, streaming a movie, or just enjoying music while you cook, your outdoor TV will be a centerpiece of fun for years to come.
Now grab your tools, follow this guide, and get ready to elevate your outdoor living experience.

