
Installing a backyard TV in your outdoor kitchen lets you enjoy movies, sports, and music while cooking or dining alfresco. This guide walks you through choosing the right TV, mounting it safely, managing cables, and protecting it from the elements—all with simple, actionable steps.
Key Takeaways
- Choose an outdoor-rated TV: Standard indoor TVs aren’t built to handle sun, rain, or temperature swings—opt for a weatherproof model designed for outdoor use.
- Pick the right mounting location: Install your TV where it’s visible from seating and cooking areas, but shielded from direct sunlight and rain.
- Use proper mounting hardware: A sturdy, weather-resistant outdoor mount with tilt or swivel features ensures both safety and viewing comfort.
- Manage cables safely: Run power and signal cables through waterproof conduits or raceways to prevent damage and tripping hazards.
- Protect against the elements: Use a weatherproof cover when the TV isn’t in use, and consider adding a shade structure like a pergola or awning.
- Test before finalizing: Power on the TV and check all connections before securing everything permanently.
- Maintain regularly: Clean the screen and inspect seals and mounts seasonally to extend your TV’s lifespan.
How to Install Backyard TV for Outdoor Kitchen
Imagine this: you’re grilling up burgers on a warm summer evening, the sun is setting, and your favorite game is playing on a crisp, clear screen right above your outdoor kitchen counter. No more running inside to check the score or missing the movie because you’re flipping steaks. With a backyard TV installed in your outdoor kitchen, you can enjoy entertainment and cooking in perfect harmony.
But installing a TV outside isn’t as simple as mounting one on your living room wall. Outdoor environments bring unique challenges—sun glare, rain, humidity, dust, and temperature extremes—that can damage standard electronics. That’s why a thoughtful, step-by-step approach is essential.
In this comprehensive guide, you’ll learn exactly how to install a backyard TV for your outdoor kitchen. We’ll cover everything from selecting the right TV and mounting hardware to running cables safely and protecting your investment from the elements. Whether you’re a DIY enthusiast or working with a contractor, these practical tips will help you create a seamless, weather-resistant outdoor entertainment setup.
By the end of this guide, you’ll have a fully functional, durable backyard TV that enhances your outdoor living space and stands up to the seasons.
Step 1: Choose the Right Outdoor TV
Visual guide about How to Install Backyard Tv for Outdoor Kitchen
Image source: i.pinimg.com
The foundation of a successful backyard TV installation starts with selecting the correct television. Not all TVs are created equal—especially when it comes to outdoor use.
Understand the Difference Between Indoor and Outdoor TVs
Standard indoor TVs are designed for climate-controlled environments. They lack protection against moisture, dust, and temperature fluctuations. Even if you mount one under a covered patio, it’s still at risk. Sunlight can cause overheating, and humidity can seep into internal components, leading to premature failure.
Outdoor TVs, on the other hand, are built specifically for exterior use. They feature:
– Weatherproof casings (often IP54 or higher rated)
– Enhanced cooling systems to prevent overheating
– Anti-glare screens for better visibility in sunlight
– Resistance to dust, rain, and UV exposure
Types of Outdoor TVs
There are two main types of outdoor TVs:
1. All-Weather Outdoor TVs: These are fully sealed, rugged units designed to be installed permanently outdoors. Brands like SunBriteTV, Seura, and Samsung’s Terrace series offer high-brightness displays and robust construction. They’re ideal for uncovered or partially covered areas.
2. Partial-Cover Outdoor TVs: These are designed for use under covered patios, pergolas, or outdoor kitchens with some overhead protection. They’re more affordable than all-weather models but still offer better durability than indoor TVs.
For an outdoor kitchen, a partial-cover model is often sufficient—especially if your setup includes a roof or awning. However, if your kitchen is fully exposed, invest in an all-weather TV.
Consider Screen Size and Resolution
Choose a screen size based on viewing distance. A general rule: for every 1.5 feet of viewing distance, aim for 1 inch of screen size. So, if you’ll be watching from 8 feet away, a 55-inch TV is a good fit.
For resolution, 4K UHD is the standard today. It delivers sharp, vibrant images—even in bright conditions—and works well with streaming services and modern devices.
Check Brightness (Nits)
Brightness is crucial outdoors. Look for a TV with at least 700 nits of brightness. All-weather models often reach 1,000–2,000 nits to combat glare. Indoor TVs typically max out around 300–500 nits, which won’t cut it in direct sunlight.
Audio Considerations
Most outdoor TVs have built-in speakers, but they’re often underpowered for open spaces. Plan to connect external weatherproof speakers or a soundbar for better audio. Many outdoor TVs support Bluetooth or have audio output ports for this purpose.
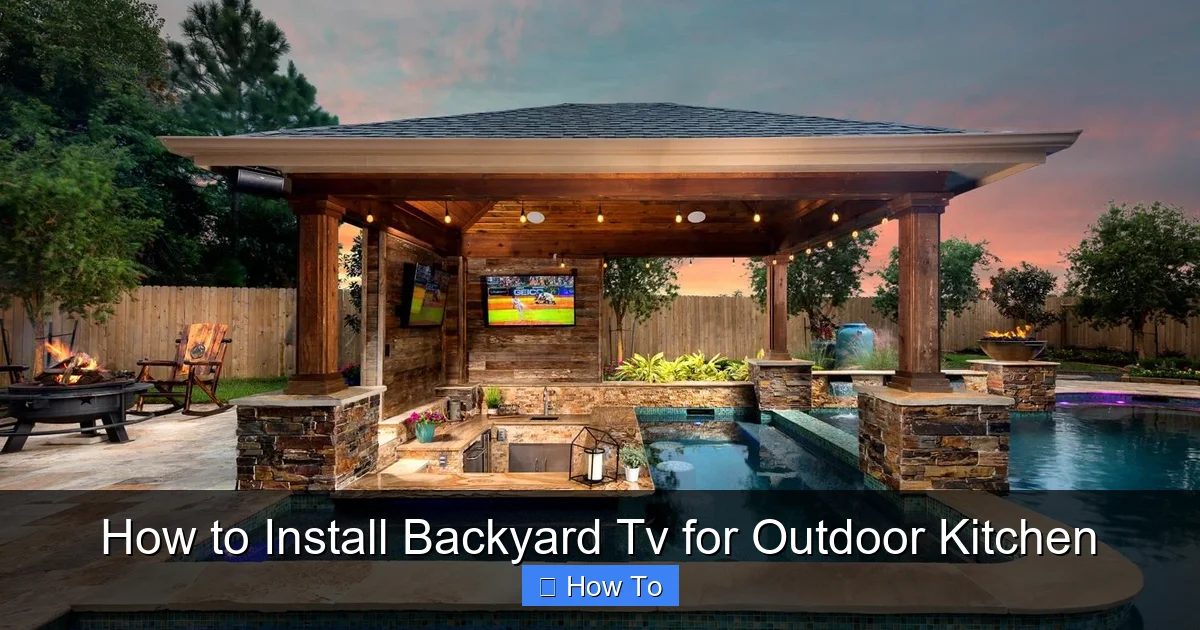
Step 2: Select the Best Mounting Location
Where you mount your TV makes a big difference in usability and longevity.
Evaluate Your Outdoor Kitchen Layout
Start by mapping out your space. Identify:
– Primary seating areas (e.g., bar stools, dining table)
– Cooking zones (grill, prep counter)
– Shaded or covered sections
Your TV should be visible from multiple angles without requiring people to crane their necks or squint.
Avoid Direct Sunlight and Rain Exposure
Even with an outdoor-rated TV, prolonged exposure to direct sunlight can cause overheating and screen damage. Similarly, rain—even light drizzle—can seep into vents or seams over time.
Ideal locations include:
– Under a covered patio or pergola
– On a wall adjacent to the outdoor kitchen
– Above a counter or bar with overhead protection
If your outdoor kitchen is fully exposed, consider adding a shade structure before installing the TV.
Check for Obstructions
Make sure nothing blocks the view—like cabinets, lighting fixtures, or hanging plants. Also, avoid placing the TV directly above a grill or smoker, as smoke and grease can accumulate on the screen and damage internal components.
Consider Viewing Height and Angle
Mount the TV at eye level when seated. For most people, this is about 42–48 inches from the floor to the center of the screen. If your seating is higher (like bar stools), adjust accordingly.
A slight downward tilt (5–10 degrees) helps reduce glare and improves viewing comfort.
Step 3: Choose the Right Mounting Hardware
A secure, weather-resistant mount is just as important as the TV itself.
Types of Outdoor TV Mounts
1. Fixed Wall Mounts: Simple and affordable. They hold the TV flush against the wall. Best for permanent, straight-on viewing.
2. Tilt Mounts: Allow you to angle the TV downward. Great for reducing glare and improving visibility from lower seating.
3. Full-Motion (Articulating) Mounts: Let you swivel and extend the TV. Ideal if you want to watch from multiple areas (e.g., kitchen, dining, lounge).
For most outdoor kitchens, a tilt or full-motion mount offers the best flexibility.
Ensure Weather Resistance
Outdoor mounts must be made of corrosion-resistant materials like powder-coated steel or aluminum. Avoid cheap plastic or untreated metal mounts—they’ll rust quickly.
Look for mounts labeled “outdoor-rated” or “weatherproof.” Many manufacturers, such as Peerless, Sanus, and Vogel’s, offer mounts specifically designed for exterior use.
Check Weight and VESA Compatibility
Verify that the mount supports your TV’s weight and VESA pattern (the spacing of the mounting holes on the back of the TV). Most outdoor TVs follow standard VESA sizes (e.g., 200×200, 400×400), but always double-check.
Use a Stud Finder and Level
Before drilling, use a stud finder to locate wall studs. Mounting into studs provides the strongest support. If you’re mounting on concrete, brick, or stucco, use appropriate anchors and a masonry drill bit.
Always use a level to ensure the mount is straight. A crooked TV is not only unsightly but can also strain the mount over time.
Step 4: Plan Your Cable Management
Exposed cables are a tripping hazard and can degrade quickly outdoors. Proper cable management is essential for safety and longevity.
Identify Required Cables
Common cables you’ll need:
– Power cord (from TV to outdoor outlet)
– HDMI cables (for streaming devices, game consoles, etc.)
– Audio cables (if using external speakers)
– Ethernet cable (for wired internet, if needed)
Use Weatherproof Conduits or Raceways
Run all cables through protective conduits or outdoor-rated raceways. These are plastic or metal channels that shield wires from moisture, UV rays, and physical damage.
For in-wall installation (if your outdoor kitchen has a wall), use in-wall rated (CL2 or CL3) HDMI and Ethernet cables inside a conduit.
Install an Outdoor-Rated Power Outlet
Your TV needs power. If you don’t already have an outdoor GFCI (Ground Fault Circuit Interrupter) outlet nearby, hire a licensed electrician to install one. GFCI outlets protect against electrical shock in wet conditions.
Place the outlet within 6 feet of the TV to avoid long, dangling power cords.
Use Cable Clips and Zip Ties
Secure loose cables to the wall or mount using outdoor-rated cable clips or UV-resistant zip ties. This keeps everything neat and prevents snagging.
Label Cables
Use waterproof labels or colored tape to identify each cable (e.g., “HDMI 1,” “Power,” “Ethernet”). This makes troubleshooting and future upgrades much easier.
Step 5: Install the TV Mount
Now it’s time to mount the hardware.
Mark the Mounting Points
Hold the mount against the wall at your desired height. Use a pencil to mark the screw holes. Double-check with a level.
Drill Pilot Holes
Drill pilot holes into the wall at the marked spots. If mounting into wood studs, use a drill bit slightly smaller than your screws. For masonry, use a hammer drill and masonry bits.
Secure the Mount
Attach the mount to the wall using the provided screws and anchors. Tighten firmly, but don’t over-torque—this can strip the holes or damage the mount.
Attach the Mounting Brackets to the TV
Most mounts come with brackets that screw into the VESA holes on the back of the TV. Use the correct screws (usually included) and tighten securely.
Hang the TV
With a helper, lift the TV and hook it onto the wall mount. Ensure it’s seated properly and locked in place (if the mount has a locking mechanism).
Step 6: Connect and Test the System
Before finalizing the installation, test everything.
Plug in the TV
Connect the power cord to the outdoor outlet. Turn on the TV and check that it powers up.
Connect Source Devices
Plug in your streaming device (e.g., Roku, Apple TV), game console, or cable box using HDMI cables. Test each input to ensure they work.
Check Audio and Video Quality
Play a video with sound. Make sure the picture is clear and the audio is loud enough for your space. Adjust settings like brightness, contrast, and volume as needed.
Test Remote Control Range
Walk around your outdoor kitchen with the remote. Ensure it works from all seating areas. If not, consider using a Bluetooth remote or installing an IR extender.
Verify Internet Connection
If using streaming services, test your Wi-Fi signal. Outdoor spaces often have weaker signals. Use a Wi-Fi extender or run an Ethernet cable for a more reliable connection.
Step 7: Protect Your TV from the Elements
Even with an outdoor-rated TV, extra protection extends its life.
Use a Weatherproof TV Cover
When the TV isn’t in use, cover it with a fitted, breathable outdoor TV cover. This shields it from dust, pollen, bird droppings, and light rain. Look for covers with UV protection and ventilation to prevent moisture buildup.
Install a Shade Structure
If your outdoor kitchen lacks overhead protection, consider adding a pergola, awning, or retractable canopy. This reduces direct sun exposure and keeps the TV cooler.
Clean Regularly
Wipe the screen with a microfiber cloth and mild cleaner (avoid ammonia-based products). Clean the vents and mount periodically to prevent dust buildup.
Inspect Seasonally
Check the mount, cables, and seals every few months. Look for signs of rust, loose screws, or frayed wires. Address issues early to avoid bigger problems.
Troubleshooting Common Issues
Even with careful planning, problems can arise. Here’s how to handle common issues:
TV Won’t Turn On
– Check the power outlet: Use another device to test if it’s working.
– Inspect the power cord: Look for damage or loose connections.
– Reset the TV: Unplug it for 30 seconds, then plug it back in.
Poor Picture Quality or Glare
– Adjust the TV’s brightness and anti-glare settings.
– Reposition the TV to avoid direct sunlight.
– Use a shade or awning to reduce glare.
Weak Wi-Fi Signal
– Move your router closer or use a Wi-Fi extender.
– Run an Ethernet cable from your router to the TV.
– Consider a mesh Wi-Fi system for large outdoor areas.
Audio Issues
– Check volume settings on both the TV and external speakers.
– Ensure audio cables are securely connected.
– Test with different audio sources to isolate the problem.
Mount Feels Loose
– Turn off the TV and remove it from the mount.
– Tighten all screws and anchors.
– If the wall is damaged, reinforce it with additional anchors or consult a professional.
Conclusion
Installing a backyard TV in your outdoor kitchen transforms your space into a true entertainment hub. It lets you enjoy your favorite shows, sports, and movies while cooking, dining, or relaxing outside. With the right TV, mount, and setup, your outdoor viewing experience can be just as enjoyable as indoors—without the worry of weather damage.
Remember, the key to success is preparation. Choose an outdoor-rated TV, pick a protected mounting location, use weatherproof hardware, and manage cables safely. Test everything before finalizing the installation, and maintain your setup regularly.
By following this guide, you’ll create a durable, functional, and stylish outdoor entertainment system that enhances your backyard kitchen for years to come. So fire up the grill, grab a cold drink, and enjoy the show—right in your own backyard.

