
Installing a patio TV for your outdoor bar enhances your entertainment space, but it requires careful planning and weatherproofing. This guide walks you through choosing the right TV, selecting a mount, running cables safely, and securing everything for year-round use. Whether you’re a DIY enthusiast or hiring help, you’ll finish with a sleek, functional setup.
Key Takeaways
- Choose a weatherproof outdoor TV: Standard indoor TVs aren’t built for humidity, rain, or temperature swings. Opt for a certified outdoor model with an IP rating of at least IP55.
- Use a sturdy, weather-resistant mount: A full-motion or tilt mount made of powder-coated aluminum or stainless steel ensures durability and adjustability in outdoor conditions.
- Plan your cable route carefully: Run power and signal cables through waterproof conduits or in-wall channels to protect them from moisture and UV damage.
- Ensure proper ventilation and sun protection: Avoid direct sunlight on the screen and allow airflow behind the TV to prevent overheating.
- Test everything before finalizing: Power on the TV, check signal strength, and verify remote functionality before sealing cables and mounting hardware.
- Consider professional installation for complex setups: If running long cable distances or drilling into stone or brick, hiring an electrician or AV specialist is wise.
- Maintain your outdoor TV regularly: Clean the screen and vents monthly and inspect seals and mounts seasonally to extend lifespan.
How to Install Patio TV for Outdoor Bar
Transforming your outdoor bar into a full-fledged entertainment hub starts with one key upgrade: a patio TV. Whether you’re hosting game nights, summer barbecues, or casual weekend hangs, having a weatherproof television mounted near your bar creates a focal point that keeps guests engaged and comfortable. But installing a TV outdoors isn’t as simple as mounting one on an indoor wall. You’re dealing with weather, power safety, cable management, and durability concerns.
In this comprehensive guide, you’ll learn exactly how to install a patio TV for your outdoor bar—from choosing the right model to securing it safely and running cables like a pro. We’ll cover every step in detail, including planning, tools, mounting, wiring, and troubleshooting. By the end, you’ll have a sleek, reliable setup that withstands the elements and delivers crystal-clear picture and sound.
Let’s get started.
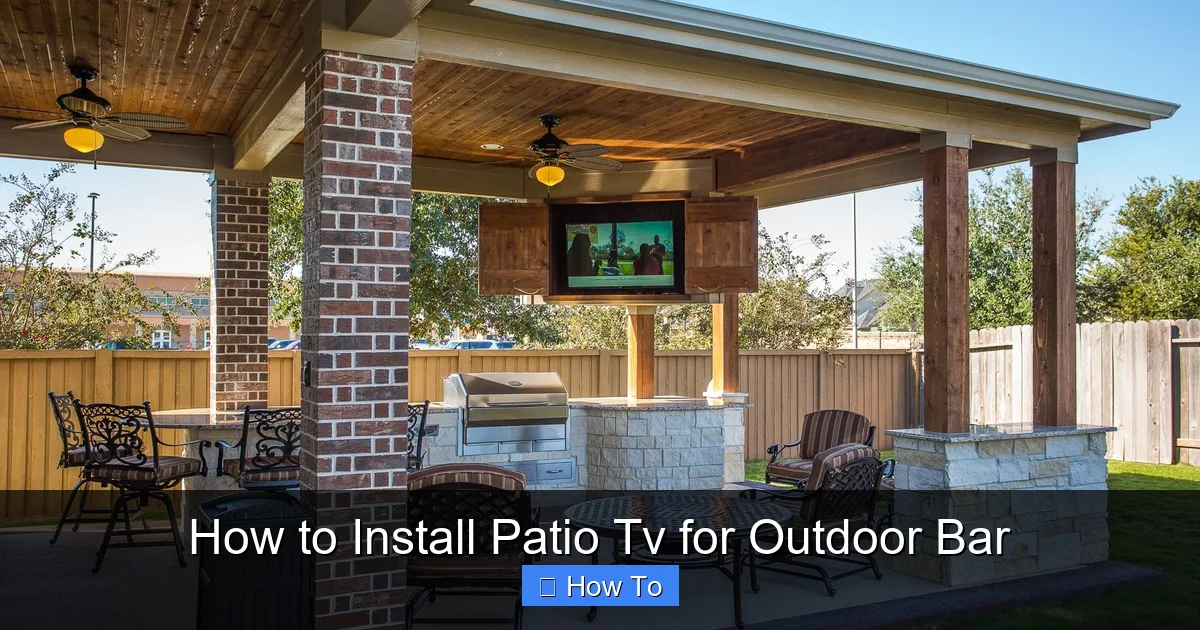
Step 1: Choose the Right Outdoor TV
Visual guide about How to Install Patio Tv for Outdoor Bar
Image source: i.pinimg.com
The foundation of a successful patio TV installation is selecting the right television. Not all TVs are created equal—especially when it comes to outdoor use.
Understand Outdoor TV Ratings
Outdoor TVs are built to handle moisture, dust, temperature extremes, and UV exposure. Look for models with an Ingress Protection (IP) rating. The IP rating consists of two numbers: the first indicates protection against solids (like dust), and the second against liquids (like rain).
For outdoor bars, aim for a TV with at least an IP55 rating. This means it’s protected from limited dust ingress and water jets from any direction. Higher ratings like IP65 or IP66 offer even better protection and are ideal for areas with heavy rain or coastal climates.
Consider Screen Brightness and Anti-Glare
Outdoor lighting can wash out indoor TV screens. Choose a TV with high brightness—measured in nits—ideally 700 nits or higher. This ensures visibility even in direct sunlight. Many outdoor TVs also feature anti-reflective coatings or matte screens to reduce glare.
For example, the Samsung The Terrace or SunBriteTV Veranda Series are popular choices with brightness levels exceeding 2,000 nits and built-in anti-glare technology.
Decide on Size and Placement
Measure the viewing distance from your bar stools or seating area to the TV location. A general rule: for every 1 inch of screen size, sit about 1.5 feet away. So, a 55-inch TV is best viewed from 6–8 feet away.
Also, consider the TV’s weight and dimensions. Larger screens may require reinforced mounting solutions, especially if you’re attaching them to a pergola, stone wall, or wooden beam.
Smart Features and Connectivity
Most modern outdoor TVs come with built-in Wi-Fi, streaming apps (like Netflix, YouTube, and Hulu), and voice control via Alexa or Google Assistant. Ensure your model has enough HDMI ports for devices like a soundbar, gaming console, or cable box.
Pro tip: If your outdoor bar has limited power outlets, look for a TV with low power consumption or consider a solar-powered option for eco-friendly setups.
Step 2: Select the Right Mounting Location
Where you mount your TV is just as important as the TV itself. The location affects visibility, safety, and longevity.
Assess Structural Support
Your mounting surface must support the TV’s weight—often 50–100 pounds or more. Avoid mounting on thin wood, drywall, or flimsy outdoor panels. Instead, anchor into solid materials like:
– Concrete or brick walls
– Reinforced wooden beams
– Metal support posts
– Pergola frames with crossbeams
Use a stud finder to locate studs if mounting on wood. For masonry, you’ll need concrete anchors or sleeve anchors.
Consider Viewing Angle and Height
Mount the TV at eye level when seated. For a bar setup, this is typically between 42 and 48 inches from the floor to the center of the screen. Avoid placing it too high, which forces guests to crane their necks.
If your bar has multiple seating areas, consider a full-motion mount that allows you to swivel the TV for optimal viewing from different spots.
Protect from Sun and Weather
Even with a weatherproof TV, prolonged exposure to direct sunlight can cause overheating. Mount the TV under an eave, pergola, or awning. If that’s not possible, install a sunshade or TV canopy.
Also, avoid areas where rain can splash directly onto the screen or where snow might accumulate. South- or west-facing walls get the most sun—ideal for winter warmth but potentially harsh in summer.
Ensure Access to Power and Signal Sources
Your TV needs power, and likely a source for content (cable, streaming, etc.). Plan your location so you can run cables neatly and safely from the TV to an outdoor-rated power outlet and your signal source (like a cable box or router).
If your bar is far from the house, consider hiring an electrician to install a dedicated outdoor circuit.
Step 3: Choose the Right Mount
The mount holds your TV securely and allows for adjustments. For outdoor use, you need a mount designed for durability and weather resistance.
Types of Outdoor TV Mounts
- Fixed mounts: Hold the TV flush against the wall. Best for permanent, straight-on viewing. Affordable and stable.
- Tilt mounts: Allow you to angle the TV up or down. Great for reducing glare from overhead lights or sun.
- Full-motion (articulating) mounts: Let you pull the TV away from the wall, swivel it side to side, and tilt it. Ideal for bars with multiple seating areas.
For most outdoor bars, a tilt or full-motion mount offers the best flexibility.
Material and Coating Matter
Choose mounts made from powder-coated aluminum or stainless steel. These resist rust and corrosion. Avoid painted steel or plastic mounts—they degrade quickly outdoors.
Look for mounts with a weight capacity at least 1.5 times your TV’s weight for safety.
Check VESA Compatibility
VESA (Video Electronics Standards Association) refers to the spacing of the screw holes on the back of your TV. Common patterns include 200×200, 400×400, and 600×400 mm.
Make sure your mount supports your TV’s VESA pattern. Most outdoor mounts are adjustable, but double-check before buying.
Step 4: Gather Tools and Materials
Before you start, gather all necessary tools and supplies. This prevents mid-project trips to the hardware store.
Essential Tools
- Stud finder (for wood surfaces)
- Level
- Drill with masonry and wood bits
- Tape measure
- Pencil or marker
- Screwdriver or impact driver
- Socket wrench (for some mounts)
- Cable staples or clips
- Wire strippers (if splicing cables)
Materials Needed
- Outdoor TV
- Weatherproof TV mount
- Concrete anchors or lag bolts (depending on surface)
- Waterproof conduit or in-wall cable raceway
- Outdoor-rated extension cord or direct wiring kit
- HDMI cables (outdoor-rated, if running long distances)
- Surge protector (outdoor-rated)
- Silicone sealant (for sealing holes)
- Optional: TV canopy or sunshade
Step 5: Prepare the Mounting Surface
A secure mount starts with proper surface preparation.
Mark the Mounting Points
Hold the mount against the wall where you want the TV. Use a level to ensure it’s straight. Mark the screw holes with a pencil.
Double-check measurements—especially if you’re mounting high up. It’s easier to adjust now than after drilling.
Drill Pilot Holes
For wood: Drill pilot holes slightly smaller than your lag screws to prevent splitting.
For concrete or brick: Use a hammer drill and masonry bit. Drill to the depth recommended by your anchor manufacturer.
Install Anchors (If Needed)
For masonry, insert concrete anchors or sleeve anchors into the holes. Tap them gently with a hammer until flush.
For wood, you can often screw directly into studs without anchors—just use lag screws rated for outdoor use.
Seal Holes
After drilling, apply a bead of outdoor silicone sealant around each hole. This prevents water from seeping into the wall and causing rot or mold.
Let the sealant cure according to the manufacturer’s instructions before proceeding.
Step 6: Install the Mount
Now it’s time to attach the mount to the wall.
Attach the Mounting Bracket
Line up the mount with your marked holes. Insert screws or bolts and tighten them securely. Use a level again to confirm the mount is straight.
For full-motion mounts, ensure the arm moves freely without wobbling.
Secure the TV Plate
Most mounts come with a plate that attaches to the back of the TV. Screw this plate onto your TV using the provided hardware. Make sure it’s tight—but don’t overtighten and crack the casing.
Hang the TV
With a helper, lift the TV and hook the plate onto the wall bracket. Listen for a click or feel it lock into place. Some mounts have safety screws to prevent accidental dislodging—install these now.
Double-check that the TV is level and secure.
Step 7: Run and Protect Cables
Exposed cables are not only unsightly—they’re a tripping hazard and vulnerable to weather damage.
Plan Your Cable Route
Determine the shortest path from the TV to your power source and signal devices. Avoid sharp bends or tight corners that can damage cables.
If running cables along the wall, use outdoor-rated cable raceways or conduits. These are plastic or metal channels that hide and protect wires.
Use Outdoor-Rated Cables
Standard indoor HDMI and power cables aren’t built for UV exposure or moisture. Use outdoor-rated HDMI cables with UV-resistant jackets. For power, use a heavy-duty outdoor extension cord or, better yet, have an electrician install a dedicated outlet.
Bury or Conduit Long Runs
If running cables underground (e.g., from the house to a detached bar), bury them in PVC conduit at least 18 inches deep. This protects against lawn mowers, frost, and rodents.
For above-ground runs, use weatherproof conduit and secure it with stainless steel straps.
Label and Organize Cables
Use zip ties or Velcro straps to bundle cables neatly. Label each cable (e.g., “HDMI 1,” “Power”) so you can easily identify them later.
Seal Cable Entry Points
Where cables enter the wall or conduit, seal the gaps with silicone or foam sealant. This prevents water and insects from getting in.
Step 8: Connect and Test the System
Before you celebrate, make sure everything works.
Plug in and Power On
Connect the TV to power and any source devices (cable box, streaming stick, etc.). Turn it on and check the picture and sound.
Test Signal Strength
If using Wi-Fi, ensure the signal is strong. Outdoor spaces often have weaker signals. Consider a Wi-Fi extender or mesh network if needed.
For cable or satellite, verify all channels load properly.
Check Remote Functionality
Test the remote from various distances and angles. If it’s inconsistent, you may need an IR extender or Bluetooth remote.
Adjust Settings
Go into the TV’s settings and adjust brightness, contrast, and color for outdoor viewing. Enable any energy-saving or anti-glare modes.
Step 9: Secure and Weatherproof
Even with a weatherproof TV, extra protection extends its life.
Install a TV Canopy (Optional)
A canopy or awning shields the TV from direct sun and rain. Choose one made of UV-resistant fabric or polycarbonate.
Use a TV Cover
When not in use, especially in winter, cover the TV with a breathable, waterproof cover. This prevents dust buildup and protects against snow and ice.
Inspect Seasonally
Every few months, check the mount, cables, and seals. Tighten any loose screws, reapply sealant if needed, and clean the screen with a microfiber cloth.
Troubleshooting Common Issues
TV Won’t Turn On
Check the power source. Is the outlet working? Try a different device. If using an extension cord, ensure it’s rated for outdoor use and not damaged.
Poor Picture Quality
This could be due to a weak signal, incorrect settings, or a damaged HDMI cable. Test with a different cable or source device.
Overheating
Ensure the TV has proper ventilation. Don’t block the vents. If it’s in direct sun, consider relocating or adding shade.
Remote Not Working
Replace the batteries. If that doesn’t help, check for obstructions or interference from other devices. Use an IR repeater if needed.
Water Damage
If you notice moisture inside the screen or around ports, power off immediately and let it dry completely. Check seals and cables for damage.
Conclusion
Installing a patio TV for your outdoor bar is a rewarding project that enhances your space and entertainment options. By choosing a weatherproof TV, mounting it securely, and protecting your cables, you create a setup that’s both functional and durable.
Remember: safety and preparation are key. Take your time, use the right tools, and don’t hesitate to call a professional for electrical work or complex installations.
With your new patio TV in place, you’re ready to host unforgettable gatherings—rain or shine. Cheers to outdoor living done right!

