
Tired of messy cables ruining your outdoor movie nights? This guide shows you how to hide cables for your patio TV with easy, safe, and weather-resistant methods. Keep your space clean, safe, and ready for family fun.
Key Takeaways
- Plan your cable route first: Measure distances and identify power sources before running any wires to avoid last-minute changes.
- Use outdoor-rated cables and conduits: Regular indoor cables can degrade in sun and rain—always choose weatherproof options.
- Secure cables with clips or raceways: Prevent tripping hazards and protect wires from damage using adhesive clips or surface-mounted raceways.
- Bury cables safely underground: For permanent setups, use direct burial cables and conduit buried at least 6–12 inches deep.
- Label and organize all connections: Make future troubleshooting easier by labeling each cable at both ends.
- Test everything before the party: Power up your system a day early to catch issues before guests arrive.
- Prioritize safety and aesthetics: A clean setup isn’t just pretty—it prevents accidents and extends equipment life.
How to Hide Cables Patio TV for Family Gatherings
Picture this: It’s a warm summer evening. Your family is gathered around the patio, laughing, sharing snacks, and settling in for a movie night under the stars. The TV turns on—only to reveal a tangled mess of cords snaking across the floor. Not exactly the relaxing vibe you were going for, right?
We’ve all been there. But here’s the good news: you can hide cables for your patio TV—safely, neatly, and without breaking the bank. Whether you’re setting up a permanent outdoor entertainment zone or just prepping for a one-time family barbecue, managing those pesky wires is totally doable. And when done right, it makes your space look cleaner, feel safer, and work better.
In this guide, we’ll walk you through every step—from planning your layout to choosing the right materials and installing them like a pro. You’ll learn how to keep cables out of sight, protected from the elements, and away from little feet (and curious pets). By the end, your patio will be ready for movie nights, game days, holiday parties, and everything in between—all without tripping over a single cord.
Why Hiding Patio TV Cables Matters
Let’s start with the “why.” Why go through the effort of hiding cables at all? After all, they’re just wires, right?
Visual guide about How to Hide Cables Patio Tv for Family Gatherings
Image source: images-na.ssl-images-amazon.com
Wrong. Exposed cables are more than an eyesore—they’re a hazard. Think about it: during a family gathering, kids are running around, drinks are being passed, and someone’s bound to step on or trip over a loose HDMI or power cord. That could mean a spilled soda, a damaged TV, or worse—an injury.
Plus, outdoor environments are tough on electronics. Sunlight, rain, humidity, and temperature swings can degrade standard indoor cables over time. If left exposed, they may fray, corrode, or short out—leaving you with a dead screen right in the middle of your favorite show.
And let’s not forget aesthetics. A clean, wire-free setup makes your outdoor space feel intentional and inviting. It says, “We care about this space,” not “We just duct-taped everything together.”
So whether you’re hosting a birthday party, a holiday dinner, or just enjoying a quiet evening with loved ones, hiding your patio TV cables ensures your setup is safe, reliable, and stylish.
Step 1: Plan Your Cable Route
Before you buy a single clip or strip of tape, take time to plan. A little foresight saves time, money, and frustration later.
Map Out Your Setup
Start by sketching a simple diagram of your patio. Include:
- The location of your TV (wall-mounted? on a stand?)
- Where your streaming device, soundbar, or receiver sits
- The nearest power outlet
- Any obstacles like furniture, planters, or railings
This helps you visualize the shortest, safest path for your cables. For example, if your TV is mounted on the wall and your streaming box is on a shelf below, you’ll want to run cables vertically down the wall—not across the floor.
Measure Twice, Cut Once
Grab a tape measure and note the distance between each component. Add a little extra length (about 6–12 inches) for slack—this gives you room to adjust connections without straining the cables.
Also, check the height of your TV and the depth of any shelves. You don’t want cables dangling or getting pinched behind furniture.
Identify Power Sources
Locate the nearest outdoor GFCI (Ground Fault Circuit Interrupter) outlet. These are essential for safety outdoors—they shut off power if they detect a fault, preventing shocks.
If you don’t have an outdoor outlet near your TV, consider hiring an electrician to install one. Never use indoor extension cords outside—they’re not rated for moisture or UV exposure and can become fire hazards.
Consider Future Access
Think ahead: Will you need to swap out devices? Upgrade your sound system? Make sure your cable route allows for easy access without dismantling your entire setup.
For example, if you’re running cables through a wall, leave a pull string inside the conduit so you can easily feed new wires later.
Step 2: Choose the Right Cables and Materials
Not all cables are created equal—especially when it comes to outdoor use. Using the wrong type can lead to signal loss, equipment damage, or safety risks.
Use Outdoor-Rated Cables
Look for cables labeled “direct burial,” “outdoor,” or “UV-resistant.” These are designed to withstand sunlight, moisture, and temperature changes.
Common outdoor-rated cables include:
- Outdoor HDMI cables: Shielded to prevent interference and coated with weatherproof jackets.
- Outdoor Ethernet cables: Essential if you’re streaming over Wi-Fi or using a wired connection for better speed.
- Outdoor power cords: Heavy-duty, with thick insulation and waterproof connectors.
Avoid using indoor cables outside—even if they seem fine at first. Over time, the insulation will crack, and the copper inside can corrode.
Invest in Conduit for Long Runs
If you’re running cables across a large patio or burying them underground, use PVC or flexible conduit. This protects wires from physical damage, rodents, and water.
Choose conduit that’s:
- UV-resistant (won’t become brittle in the sun)
- Flexible enough to bend around corners
- Large enough to fit all your cables with room to spare
For example, a 1-inch diameter conduit can comfortably hold an HDMI cable, power cord, and Ethernet cable.
Pick the Right Fasteners
You’ll need clips, raceways, or adhesive strips to secure cables along walls, under railings, or across floors.
- Cable clips: Small plastic or metal clips that screw or stick to surfaces. Great for short runs along baseboards or under eaves.
- Surface raceways: Plastic channels that snap open to hold multiple cables. Ideal for exposed areas where you want a clean, finished look.
- Adhesive cable ties: Use outdoor-rated versions with strong adhesive backing. Avoid cheap ones—they lose grip in heat or rain.
Always test adhesives on a small area first to make sure they won’t damage paint or siding.
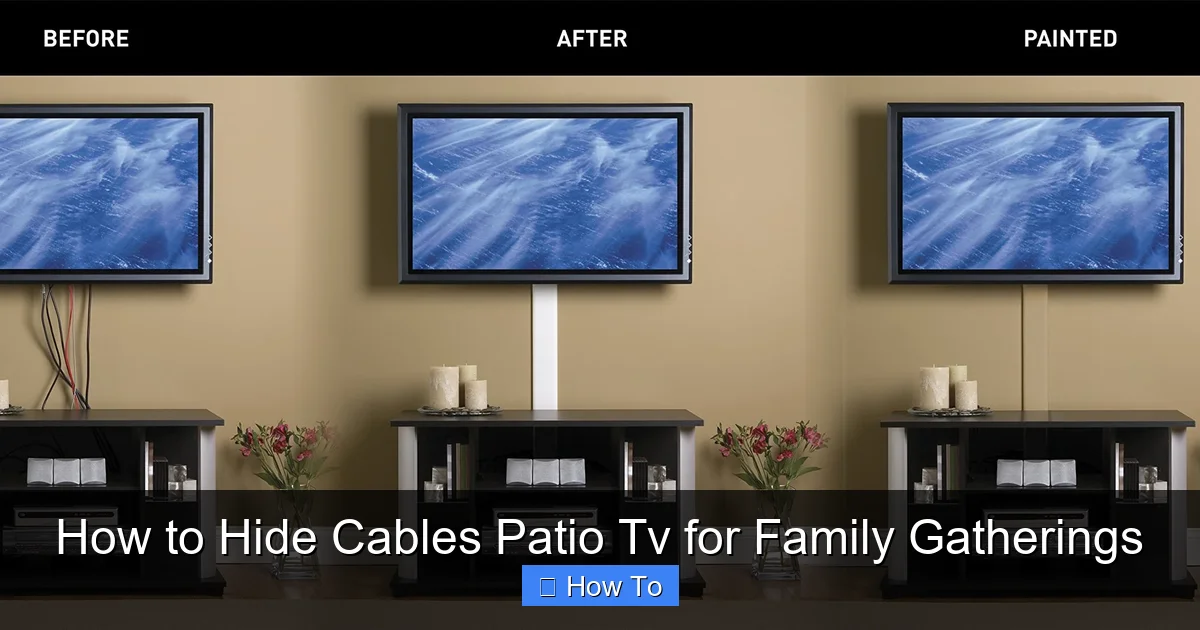
Step 3: Run Cables Along Walls or Under Railings
For most patio setups, running cables vertically or horizontally along walls is the easiest and most effective method.
Mount Cables to the Wall
If your TV is wall-mounted, run cables straight down the wall from the back of the TV to the outlet or device below.
Use cable clips spaced every 12–18 inches to keep wires snug against the wall. This prevents sagging and keeps them out of sight.
For a cleaner look, paint the clips to match your wall color. Or use clear clips that blend in.
Hide Cables Behind Trim or Molding
Many patios have baseboards, crown molding, or decorative trim. You can tuck cables behind these features for a nearly invisible setup.
Gently lift the trim with a pry bar (be careful not to damage it), slide the cables behind, and reattach. Use foam weatherstripping to fill any gaps and keep pests out.
Use Railings and Fences
If your patio has a railing or fence, run cables along the underside. This keeps them off the ground and out of the way.
Secure them with zip ties or adhesive clips rated for outdoor use. Make sure the cables don’t interfere with gate movement or latch mechanisms.
Go Around Corners Smoothly
When turning a corner, avoid sharp bends—they can damage cables over time. Use conduit elbows or gently curve the wires with a large radius.
If using raceways, choose corner pieces that match the angle of your wall. Most kits include 90-degree and 45-degree connectors.
Step 4: Use Raceways for a Clean, Professional Look
Surface-mounted raceways are one of the best ways to hide multiple cables while keeping them accessible.
Choose the Right Raceways
Look for outdoor-rated raceways made from UV-resistant PVC or ABS plastic. They come in white, black, or paintable finishes to match your patio.
Popular brands include Legrand, D-Line, and Cord Cover. Most are self-adhesive or screw-mounted and include corner pieces and end caps.
Install the Raceways
- Clean the surface with rubbing alcohol to remove dirt and grease.
- Measure and cut the raceway to fit your cable run. Use a hacksaw or utility knife.
- Snap open the raceway and lay your cables inside.
- Close the cover and press firmly to secure.
- Attach end caps to prevent dust and water from entering.
For corners, use pre-bent connectors or carefully heat the raceway with a hairdryer to soften it before bending.
Paint to Match (Optional)
If your raceway doesn’t blend in, paint it to match your wall or trim. Use exterior-grade spray paint and let it dry completely before installing.
This small touch makes a big difference in creating a seamless look.
Step 5: Bury Cables Underground (For Permanent Setups)
If you’re building a dedicated outdoor entertainment area, burying cables is the ultimate solution for a truly wire-free look.
Use Direct Burial Cables
Only use cables specifically rated for direct burial. These have thicker insulation and are designed to resist moisture, soil acidity, and physical pressure.
Never bury standard indoor cables—even inside conduit. They’re not built for underground conditions.
Install Conduit for Protection
Even with direct burial cables, it’s smart to run them through PVC conduit. This adds an extra layer of protection and makes future upgrades easier.
Use Schedule 40 or 80 PVC pipe, depending on your soil conditions. Schedule 80 is thicker and better for high-traffic areas.
Dig the Trench
Call 811 before you dig—this free service locates underground utilities so you don’t hit gas or water lines.
Dig a trench 6–12 inches deep (deeper if required by local code). The depth depends on your climate and soil type—frost lines and rodent activity matter.
Use a trenching shovel or rent a small trencher for longer runs. Keep the trench straight and level to avoid kinks in the cables.
Run and Secure the Cables
Feed the cables through the conduit before burying. Use a fish tape or pull string to guide them smoothly.
Leave a little slack at both ends for connections. Label each cable at both ends with waterproof tags.
Backfill and Mark the Area
Fill the trench with soil, tamping it down gently to avoid air pockets. Avoid sharp rocks that could puncture the conduit.
Mark the burial path with landscape staples or a garden hose so you remember where the cables are. This prevents accidental damage during future landscaping.
Step 6: Secure Loose Cables and Prevent Tripping
Even with a great plan, some cables may still end up on the floor—especially if you’re using a portable TV stand or speaker system.
Use Cable Covers or Mats
For temporary setups, use rubber cable covers or floor mats designed to hide and protect wires.
These are great for parties or events where you don’t want to drill holes or run permanent raceways. Just lay them over the cables and secure with double-sided tape.
Tape Cables to the Floor (Temporarily)
Use gaffer tape or outdoor-rated duct tape to secure cables along thresholds or under furniture.
Avoid regular Scotch tape—it loses adhesion outdoors and leaves sticky residue.
Route Cables Under Rugs or Mats
If you have an outdoor rug, tuck cables underneath. Make sure the rug is flat and won’t bunch up, which could cause tripping.
Never run power cords under rugs—this can cause overheating and fire hazards.
Use Furniture to Your Advantage
Place coffee tables, benches, or planters strategically to block view of cables. A well-placed outdoor sofa can hide a whole bundle of wires.
Just make sure the furniture doesn’t pinch or crush the cables.
Step 7: Test and Maintain Your Setup
Once everything is installed, don’t assume it’s ready to go. Testing ensures safety and performance.
Power On and Check Connections
Turn on your TV, streaming device, and any audio equipment. Make sure all signals are strong and there’s no interference.
Watch for flickering screens, audio dropouts, or error messages—these could indicate loose connections or damaged cables.
Inspect for Damage
Look for frayed insulation, cracked connectors, or signs of overheating. If you see any issues, replace the cable immediately.
Check clips and raceways to ensure they’re still secure. Wind, rain, and temperature changes can loosen adhesives over time.
Schedule Regular Maintenance
Every 3–6 months, inspect your outdoor setup. Clean dust and debris from raceways, tighten loose clips, and re-secure any cables that have shifted.
This prevents small problems from becoming big ones—and keeps your patio party-ready year-round.
Troubleshooting Common Issues
Even the best plans can run into hiccups. Here’s how to fix the most common problems.
Cables Keep Coming Loose
If clips or adhesives fail, switch to screw-mounted fasteners. Or use outdoor-rated zip ties for extra grip.
Signal Loss or Interference
This often happens with long HDMI runs. Use an HDMI extender or switch to a wireless streaming solution like a Roku or Apple TV with strong Wi-Fi.
Water in Conduit
If you find moisture inside buried conduit, install a drip loop at the entry point and use waterproof connectors. Consider adding a small drain hole at the lowest point.
Animals Chewing Cables
Rats, squirrels, and raccoons love chewing on wires. Use metal conduit or add rodent repellent tape around vulnerable areas.
Paint Damaged by Adhesives
If clips or tape peel off paint, use removable outdoor hooks or switch to magnetic cable management systems.
Conclusion
Hiding cables for your patio TV isn’t just about looks—it’s about creating a safe, functional, and inviting space for family gatherings. With the right planning, materials, and techniques, you can eliminate tripping hazards, protect your equipment, and enjoy a clean, wire-free setup every time you hit play.
Whether you’re using simple clips, stylish raceways, or going all-in with buried conduit, the key is to choose solutions that match your setup and climate. And remember: a little effort now saves headaches later.
So next time you’re hosting a backyard barbecue or movie night, your guests will notice the great food, the cozy seating, and the crystal-clear picture—not the cables. Because you’ve got it all under control.
Now go enjoy that sunset—your patio is ready.

