
Transform your deck into an entertainment hub by installing an outdoor television with this detailed guide. We’ll walk you through choosing the right TV, mounting it securely, managing cables, and protecting it from the elements—so you can enjoy movie nights under the stars.
Key Takeaways
- Choose a true outdoor TV: Not all TVs labeled “outdoor” are equal—look for models specifically designed for full exposure to sun, rain, and temperature changes.
- Pick the right mounting location: Avoid direct sunlight and ensure the TV is visible from your seating area while staying protected from harsh weather.
- Use weatherproof mounts and enclosures: Standard indoor mounts won’t cut it—invest in corrosion-resistant, VESA-compatible outdoor mounts rated for your TV’s size and weight.
- Manage cables safely: Run power and signal cables through waterproof conduits or raceways to prevent damage and tripping hazards.
- Protect against power surges: Use outdoor-rated surge protectors and GFCI outlets to safeguard your equipment from lightning and moisture.
- Test and maintain regularly: Check seals, clean the screen, and inspect connections seasonally to ensure long-term performance.
- Enhance the experience: Add outdoor speakers, smart lighting, or a streaming device to create a full deck entertainment system.
How to Install Outdoor Television for Deck Entertainment
Imagine sipping lemonade on a warm summer evening, the sun setting behind your backyard, and your favorite movie playing on a crisp, clear screen right on your deck. No more squinting at a tablet or crowding around a laptop—just pure outdoor entertainment. Installing an outdoor television on your deck can turn your outdoor space into a true extension of your living room. But it’s not as simple as mounting a regular TV outside. You need the right equipment, planning, and know-how to ensure safety, durability, and great performance.
In this comprehensive guide, we’ll walk you through every step of installing an outdoor television for deck entertainment—from choosing the perfect TV and mounting location to running cables and protecting your investment from the elements. Whether you’re a DIY enthusiast or hiring a pro, this guide will help you create a weatherproof, high-quality outdoor viewing experience that lasts for years.
Step 1: Choose the Right Outdoor Television
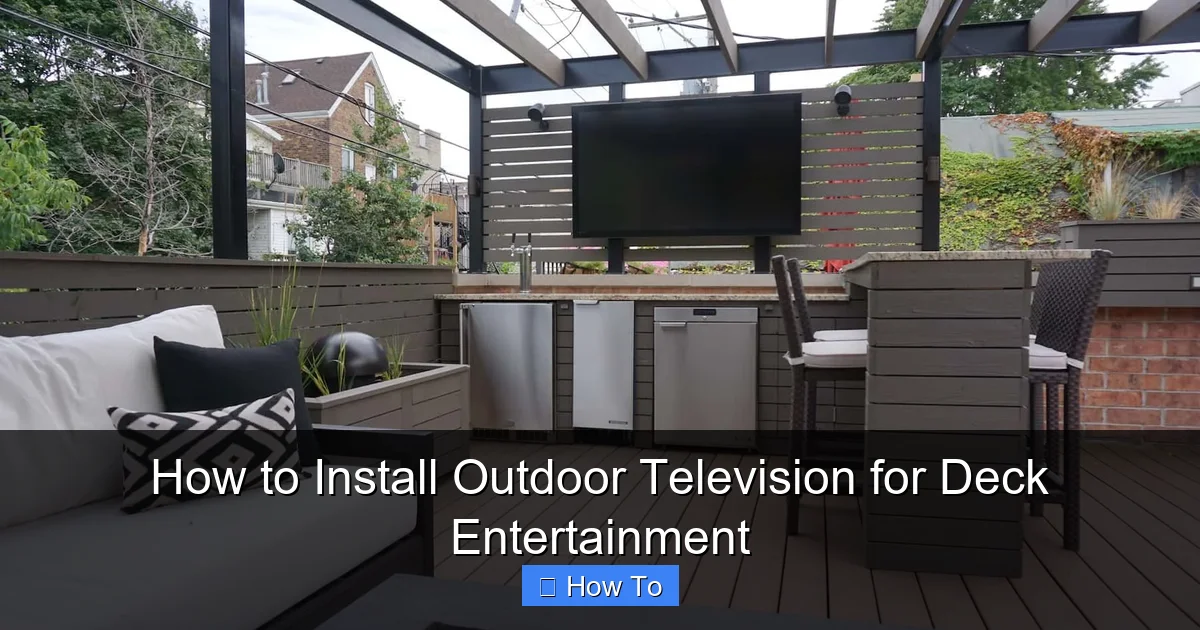
Visual guide about How to Install Outdoor Television for Deck Entertainment
Image source: i.pinimg.com
Not all TVs are built for the great outdoors. While some manufacturers market “outdoor TVs,” there are important differences between models. To get the best results, you need a television specifically engineered for outdoor use.
Understand the Types of Outdoor TVs
There are three main types of outdoor TVs:
- Weatherproof Outdoor TVs: These are fully sealed units designed to withstand rain, snow, dust, and extreme temperatures. They often come with built-in cooling and heating systems to prevent overheating in summer or freezing in winter. Brands like SunBriteTV, Samsung Terrace, and Seura offer high-quality weatherproof models.
- Partial Sun/Shade TVs: These are ideal for covered decks or areas with partial sun exposure. They’re less expensive than full-exposure models but still offer better brightness and durability than indoor TVs.
- Indoor TVs in Outdoor Enclosures: Some homeowners use standard indoor TVs inside weatherproof enclosures. While this can be cost-effective, it requires careful ventilation and may void warranties. Only consider this option if you’re experienced with modifications.
Key Features to Look For
When shopping for an outdoor TV, prioritize these features:
- Brightness (nits): Outdoor screens need high brightness to combat glare. Look for at least 700 nits, but 1000+ nits is ideal for sunny decks.
- Anti-Glare and Anti-Reflective Coatings: These reduce screen reflections and improve visibility in daylight.
- Wide Viewing Angles: Choose a TV with IPS or similar panel technology so everyone on the deck can see the screen clearly.
- Built-in Cooling and Heating: Ensures the TV operates safely in temperatures from -22°F to 122°F (-30°C to 50°C).
- Weatherproof Rating: Look for an IP55 or higher rating, which means protection against dust and water jets.
- Smart Features: Built-in Wi-Fi, streaming apps (like Netflix, YouTube), and voice control make setup easier and reduce the need for external devices.
Size and Placement Considerations
Choose a TV size based on your viewing distance. A general rule: for every 1.5 feet of viewing distance, use 1 inch of screen size. For example, if your seating is 8 feet away, a 55-inch TV is ideal.
Also, consider the TV’s weight. Larger models can weigh 50+ pounds, so ensure your deck structure and mount can support it.
Step 2: Select the Ideal Mounting Location
Where you mount your TV is just as important as the TV itself. A poor location can lead to glare, poor visibility, or damage from weather.
Assess Your Deck Layout
Walk around your deck and identify the best spot. Ask yourself:
- Where do people usually sit or gather?
- Is there shade from a pergola, awning, or trees?
- Is the area protected from wind, rain, and direct sunlight?
- Can you run power and cables safely to this location?
Avoid Direct Sunlight
Even the brightest outdoor TVs struggle in direct, midday sun. If possible, mount the TV under a covered area like a pergola, gazebo, or roof overhang. If shade isn’t available, consider installing a retractable awning or shade sail to protect the screen.
Ensure Clear Line of Sight
The TV should be visible from all primary seating areas. Avoid mounting it too high—eye level when seated is ideal. For most people, this means mounting the center of the screen 42 to 48 inches from the ground.
Check for Obstructions
Make sure trees, railings, or furniture won’t block the view. Also, avoid placing the TV near grills, fire pits, or sprinklers, which can cause heat damage or water exposure.
Step 3: Choose the Right Outdoor TV Mount
Standard indoor TV mounts are not suitable for outdoor use. You need a mount designed for weather resistance and durability.
Types of Outdoor Mounts
- Fixed Wall Mounts: Simple and secure, these hold the TV flush against the wall. Best for permanent setups where you don’t need to adjust the angle.
- Tilting Mounts: Allow you to angle the TV downward for better viewing from seated positions. Great for decks with elevated seating.
- Full-Motion (Articulating) Mounts: Let you swivel and extend the TV for flexible viewing. Ideal if you want to watch from different areas of the deck.
Key Features to Look For
- Weatherproof Coating: Look for powder-coated steel or aluminum with rust-resistant finishes.
- VESA Compatibility: Ensure the mount matches your TV’s VESA pattern (e.g., 200×200, 400×400).
- Weight and Size Rating: The mount must support your TV’s weight and dimensions.
- Locking Mechanism: Prevents theft and keeps the TV secure in windy conditions.
Installation Tips
- Use a stud finder to locate wall studs or deck framing. Never mount directly into siding or drywall alone.
- If your deck wall isn’t sturdy, consider mounting to a post or beam.
- Use stainless steel lag bolts and anchors rated for outdoor use.
- Leave a small gap (1–2 inches) between the TV and wall for airflow and cable access.
Step 4: Prepare for Power and Signal Connections
Running power and signal cables safely is crucial for both performance and safety.
Power Requirements
Outdoor TVs need a dedicated power source. Here’s how to set it up:
- Use a GFCI Outlet: Ground Fault Circuit Interrupter outlets are required for outdoor use. They shut off power if they detect a fault, preventing shocks.
- Install a Weatherproof Outlet Box: Use an in-use cover that protects the outlet even when cords are plugged in.
- Run Conduit for Permanent Installs: If you’re running wires through walls or under the deck, use waterproof electrical conduit (like PVC or metal) to protect cables.
- Use Outdoor-Rated Extension Cords (Temporarily): Only use heavy-duty, outdoor-rated cords with built-in surge protection. Never leave them exposed long-term.
Signal and Connectivity Options
You’ll likely want to connect streaming devices, cable boxes, or gaming consoles. Here’s how:
- HDMI Over Ethernet: For long cable runs, use HDMI over Cat6 extenders to maintain signal quality.
- Wireless Streaming: If your TV has built-in Wi-Fi, you can stream directly from your phone, tablet, or laptop using apps like AirPlay or Chromecast.
- Outdoor Streaming Devices: Consider weatherproof enclosures for devices like Roku Ultra or Apple TV if they’re mounted outside.
- Cable Management: Use cable raceways, zip ties, or conduit to keep wires neat and protected. Avoid loose cords that can trip people or get damaged.
Step 5: Install the TV Mount and TV
Now it’s time to put everything together. Follow these steps carefully.
Gather Your Tools
You’ll need:
- Drill and drill bits
- Level
- Stud finder
- Tape measure
- Screwdriver or impact driver
- Socket wrench (for lag bolts)
- Safety goggles and gloves
Mount the Bracket
- Hold the mount against the wall or post at the desired height.
- Use a level to ensure it’s straight.
- Mark the screw holes with a pencil.
- Drill pilot holes into the studs or framing.
- Secure the mount with lag bolts. Tighten firmly but don’t over-tighten.
Attach the TV
- Have a helper hold the TV while you attach the mounting arms to the back.
- Use the provided screws and ensure they’re tight.
- Lift the TV and hook it onto the wall bracket.
- Lock the TV in place using the security screws or locking mechanism.
- Double-check that the TV is level and secure.
Connect Cables
- Run power and HDMI cables through the mount’s cable management system.
- Plug in the power cord and any devices.
- Tuck excess cable behind the TV or into a raceway.
- Test all connections before finalizing the setup.
Step 6: Protect Against Power Surges and Weather
Outdoor electronics are vulnerable to lightning, power surges, and moisture.
Use a Surge Protector
Even with a GFCI outlet, you need extra protection. Use an outdoor-rated surge protector with at least 2000 joules of protection. Plug your TV and all connected devices into it.
Install a Lightning Arrestor (Optional)
If you live in a lightning-prone area, consider installing a lightning arrestor on your electrical panel. This diverts excess voltage away from your home’s wiring.
Seal All Connections
Use silicone sealant or weatherproof tape to seal cable entry points into the TV, mount, or enclosure. This prevents moisture from seeping in.
Consider a TV Cover
When not in use, especially during storms or winter, use a fitted outdoor TV cover to protect the screen and vents from debris and UV damage.
Step 7: Test and Optimize Your Setup
Once everything is installed, it’s time to test and fine-tune.
Power On and Check Display
Turn on the TV and check for:
- Clear, bright picture
- No flickering or color issues
- Proper audio output
Adjust Picture Settings
Outdoor lighting changes throughout the day. Use the TV’s settings to:
- Increase brightness and contrast
- Enable “Outdoor Mode” if available
- Adjust color temperature for daylight viewing
Test Streaming and Connectivity
Connect to Wi-Fi and test streaming apps. If using external devices, ensure they’re recognized and functioning.
Check for Glare and Reflections
Watch the TV at different times of day. If glare is an issue, consider adding a shade or adjusting the angle.
Troubleshooting Common Issues
Even with careful planning, problems can arise. Here’s how to fix common issues.
TV Won’t Turn On
- Check the power outlet with another device.
- Ensure the surge protector is on and functioning.
- Verify all cables are securely connected.
Poor Picture Quality
- Adjust brightness and contrast settings.
- Check for loose HDMI connections.
- Ensure the signal source (cable box, streaming device) is working.
Overheating or Shutting Down
- Make sure vents aren’t blocked.
- Check that the TV isn’t in direct sunlight.
- Ensure the ambient temperature is within the TV’s operating range.
Wi-Fi Connection Drops
- Move your router closer or use a Wi-Fi extender.
- Switch to a less congested Wi-Fi channel.
- Use a wired Ethernet connection if possible.
Moisture Inside the TV or Enclosure
- Turn off and unplug the TV immediately.
- Let it dry completely in a warm, dry place.
- Check seals and reapply weatherproofing if needed.
- Consider a dehumidifier in humid climates.
Enhance Your Deck Entertainment Experience
Your outdoor TV is just the beginning. Take your deck to the next level with these additions.
Add Outdoor Speakers
Built-in TV speakers often lack volume and clarity outdoors. Install weatherproof speakers around the deck for immersive sound. Wireless options like Sonos Move or Bose SoundLink are great for flexibility.
Install Smart Lighting
Use smart LED strip lights or path lights to create ambiance. Many can sync with your TV or music for a dynamic experience.
Include a Streaming Device
If your TV isn’t smart, add a Roku, Apple TV, or Amazon Fire Stick for access to thousands of apps.
Create a Viewing Zone
Arrange outdoor furniture, add a coffee table, and include blankets or cushions for comfort. Consider a fire pit or outdoor heater for cooler evenings.
Maintenance Tips for Long-Term Performance
To keep your outdoor TV in top shape, follow these maintenance steps:
- Clean the Screen Weekly: Use a microfiber cloth and screen-safe cleaner. Avoid paper towels or harsh chemicals.
- Inspect Seals Monthly: Check for cracks or gaps in weatherproofing.
- Check Cables Seasonally: Look for fraying, corrosion, or loose connections.
- Cover During Storms: Use a protective cover during heavy rain, snow, or high winds.
- Service Annually: Have a professional inspect electrical connections and mounting hardware.
Conclusion
Installing an outdoor television on your deck is a rewarding project that can transform your outdoor space into a true entertainment destination. By choosing the right weatherproof TV, mounting it securely, managing cables safely, and protecting it from the elements, you’ll enjoy years of movie nights, sports games, and backyard gatherings under the stars.
Remember, safety and durability are key. Don’t cut corners on weatherproofing or electrical protection. With the right planning and execution, your deck will become the heart of your home’s outdoor lifestyle.
So grab your tools, pick out your favorite show, and get ready to elevate your deck entertainment—one outdoor TV installation at a time.

